Categories

Pasta Pizza Pie

mushroom pasta pizza bake pie

Pasta Pizza Pie combines two Italian favorites (and two of my favorites!) into a delicious pizza-inspired baked pasta.  First, you start by baking a pasta “crust.”  Then you spread your favorite pasta sauce over the crust and top it with your favorite toppings.  I used a 12-inch saute pan in lieu of a pizza pan, and it worked great!

Pasta Pizza Pie puts a fun twist on pizza and a fun twist on pasta,…and incidentally since it’s also a “pie,” this Pasta Pizza Pie is perfect for today, March 14th (3.14)…”Pi Day!”


Pasta Pizza Pie
 
Yields: 4 servings
Ingredients
  • Cooking spray
  • 1 tablespoon canola oil
  • 1 large onion, chopped*
  • 1 cup sliced mushrooms (I used baby bellas)*
  • 2 garlic cloves, minced *
  • 1 egg, beaten
  • ¼ cup milk (I used skim)
  • 8 ounces (1/2 of a 1 pound box) rotini-shaped pasta, cooked and drained
  • 1 cup shredded part-skim mozzarella cheese (about 4 ounces)
  • 1½ cups of your favorite pasta sauce (I used Muir Glen Tomato Basil)
  • crushed red pepper flakes, to taste
  • * substitute with your favorite pizza toppings
Instructions
  1. Preheat oven to 350 degrees. Spray 12-inch saute pan or pizza pan with cooking spray and set aside.
  2. In a large skillet, heat oil over medium heat. Add onion and mushrooms and cook until tender, about 5 to 7 minutes, stirring occasionally. In the last minute, add minced garlic and stir for 1 minute. Remove from heat.
  3. In a medium bowl, stir egg, milk, pasta and ½ cup cheese. Spread pasta mixture in prepared pizza pan. Bake this pasta crust for 20 minutes.
  4. Remove pasta crust from oven and spread sauce over crust. Top with onion-mushroom mixture. Sprinkle with remaining cheese. Shake crushed red pepper flakes over cheese.
  5. Bake for 15 minutes, or until cheese is melted. Let stand 5 minutes before serving.

Source: Campbell’s Kitchen

healthy blueberry strawberry blackberry yogurt smoothie

Diet Mixed Berry Smoothie

healthy diet mixed blueberry strawberry blackberry yogurt smoothie

This Diet Mixed Berry Smoothie is quick and easy to make and perfect for breakfast on a busy morning, a post-workout recovery drink, or an afternoon pick me up.  Made with just a few healthy ingredients, it’s a vitamin-packed smoothie that can be enjoyed anywhere, anytime (and portable too for when you’re on-the-go!).


Recently, I was given the opportunity to try Ocean Spray’s Diet Juice Drinks and thought it would a tasty addition to this smoothie recipe.  At only 5 calories per serving, swapping out full-calorie juices in favor of Ocean’ Spray’s Diet Juice Drinks can help save calories (and carbs, if that’s a concern), while still tasting delicious.   For this recipe, I used Ocean Spray’s Diet Cranberry juice and it went nicely with the berries used in the rest of this smoothie.  For next time, I have my eyes on the Diet Blueberry Pomegranate!

To learn more about Ocean Spray’s Diet Juice Drinks, visit http://www.oceanspray.com/Products/Juices/Diet-Light/Diet-Cranberry-Juice-Drink.aspx.


Diet Mixed Berry Smoothie
 
Yields: 1 servings
Ingredients
  • ½ cup Diet Ocean Spray Cranberry Juice Drink, any flavor
  • ½ cup frozen mixed berries (strawberries, raspberries, blackberries and blueberries)
  • 1 ripe banana, frozen and cut into slices
  • 3 ounces fat free plain or berry-flavored Greek yogurt
  • 1 tablespoon flaxseed (optional)
Instructions
  1. Combine all ingredients in a blender (or Magic Bullet). Blend on high speed until ingredients are thoroughly combined. Pour into a chilled glass. Enjoy!
Notes
Tip: slice banana before freezing...it's much easier!

 Adapted from Ocean Spray


I have partnered with Ocean Spray through DailyBuzz to help promote their new Ocean Spray Diet product. I have been compensated for my time commitment to work with this product, however my opinions are entirely my own and I have not been paid to publish positive comments.

Healthy Banana Cookies - vegan, no added sugar and nut free | alidaskitchen.com

Healthy Banana Cookies

Healthy Banana Cookies - vegan, no added sugar and nut free | alidaskitchen.com
 Healthy Banana Cookies are a chewy, fruit-filled cookie made using some of my favorite foods – oats, dates and bananas.  They are made from simple, wholesome ingredients, have no butter and added sugar, thus making them a healthier choice.  I love the simplicity of these cookies and have to admit these cookies made a delightful breakfast!  These Healthy Banana Cookies also happen to be dairy free and can be gluten free.
Healthy Banana Cookies from Alida's Kitchen

I have had this at the top of my ‘to make’ pile for months just waiting for some super ripe bananas.   While we always have plenty of super ripe bananas in the house, they’re typically reserved for Pumpkin Banana Muffins or Pumpkin Banana Pancakes (or Strawberry Banana Pancakes once strawberry season hits).  Fortunately, I was a muffin and pancake making machine in advance of our new baby’s arrival, stocking the freezer full of Adam’s favorite banana goodies.  With a stocked freezer and 3 very ripe bananas, it was finally my opportunity to try these Healthy Banana Cookies!

Healthy Banana Cookies | alidaskitchen.com
Healthy Banana Cookies
 
Yields: approx. 24 cookies
Ingredients
  • 3 very ripe bananas
  • 2 cups rolled oats (old-fashioned or quick cooking work fine)
  • 1 cup (8 ounces) pitted dates, chopped
  • ⅓ cup canola oil
  • 1 teaspoon vanilla extract
  • 1 teaspoon cinnamon
Instructions
  1. Preheat oven to 350 degrees. Line cookie sheets with parchment paper and set aside.
  2. In a large bowl, mash bananas. Add oats, dates, oil, vanilla and cinnamon, and mix well. Let sit for 15 minutes.
  3. Drop dough by rounded teaspoonful onto prepared cookie sheets. [Note: the cookies don't spread so you may want to shape them a bit]
  4. Bake cookies for 20 minutes, or until they are golden brown. Let cool on cookie sheet for 5 minutes and then move to a wire rack to cool completely.
Notes
These are best enjoyed the day after baking.
healthy banana cookies vegan dates oats

Coincidentally, this is also the first month of the Eating the Alphabet Healthy Recipe Challenge for 2013, hosted by Brenda of Meal Planning Magic.  Each month, several bloggers will focus on healthy recipes featuring fruits, vegetables grains or legumes, from a couple different letters (this month it is A or B).  I thought Healthy Banana Cookies would be the perfect healthy recipe to start off this fun series.

easy make ahead chocolate pudding cakes

Warm Chocolate Pudding Cakes


While Valentine’s Day isn’t a huge deal at our house, it does give me a reason to bake up something extra special…usually involving chocolate.  Warm Chocolate Pudding Cakes are definitely something special.  They are a simple yet decadent dessert that is pure comfort food.  They are also surprisingly quick and easy to make and can even be made a day in advance (great for entertaining!).  The recipe can easily be halved to serve only two, OR make the full recipe and enjoy one set of cakes one day and enjoy them again the next day.   Warm Chocolate Pudding Cakes are delicious as-is, or topped with your favorite ice cream.  I had vanilla bean on hand, which was classic and tasty, but I am drooling over the idea of a salted caramel ice cream topping these cakes.

Since I made the full recipe for the two of us, we got to enjoy Warm Chocolate Pudding Cakes two nights in a row.  I’m pretty sure Valentine’s Day is going to become one of our favorite holidays now, if it means special desserts like this! 

Warm Chocolate Pudding Cakes
 
Yields: 4 servings
Ingredients
  • 4 ounces semi-sweet or bittersweet chocolate, chopped
  • 4 tablespoons (1/2 stick) butter
  • 4 tablespoons granulated sugar, divided
  • 2 eggs, whites and yolks separated
  • 1 teaspoon vanilla extract
  • pinch of salt
  • Cooking spray
Instructions
  1. Preheat oven to 375 degrees (if not making ahead). Spray four 6 to 8 ounce ramekins with cooking spray, place on a baking sheet and set aside.
  2. In a double boiler (or a mixing bowl placed over simmering water), melt chocolate and butter, stirring occasionally. Once melted, remove from heat and mix in 2 tablespoons sugar and then egg yolks and vanilla, stirring until until combined. Set aside.
  3. In a medium bowl, beat egg whites and salt until soft peaks form. Add 2 tablespoon sugar and beat until stiff and glossy.
  4. Fold ⅓ egg white mixture into chocolate mixture, gently stirring to combine. Add the rest of the egg whites, gently folding until combined. Divide evenly among prepared ramekins. (If making ahead, stop here. Cover cakes with plastic wrap and refrigerate until ready to bake).
  5. Bake for 15 to 20 minutes, or until the cakes puff up and the tops begin to crack. Be careful not to over bake. A toothpick inserted in the center should come out gooey. Serve warm or at room temperature, topped with ice cream, if desired.


Source:  Everyday Food, December 2006

Baked Balsamic Chicken | alidaskitchen.com

Baked Balsamic Chicken

Tracking Pixel

Baked Balsamic Chicken is wholesome, easy and delicious!  This dish can be customized to use whatever herbs you like (or have on hand) and is perfectly paired with Minute® Multi-Grain Medley! Thank you Minute® Rice for sponsoring this post.
Baked Balsamic Chicken | alidaskitchen.com
 This Baked Balsamic Chicken recipe has been a family favorite for years. The recipe was created when Greta was first born over 3 years ago and has been a regular feature on the dinner rotation ever since. The marinade takes minutes to prepare and then is poured in a zip-top bag with the chicken.  Let that sit in the refrigerator until you’re ready to bake.  Then you just pour the chicken and marinade in a baking dish and bake.  Simple!

Read more

Lemon Buttermilk Cake

easy lemon buttermilk breakfast pound cake


We had a special surprise arrive last Friday ~ our baby decided to arrive a little early!  Naturally, when there is a birthday, there must be a birthday cake.  This Lemon Buttermilk Cake is quick and easy enough for a sleepy mama to whip together in minutes.  It’s not only simple to make, but the lemon cake is perfectly lemon-y, refreshing and delicious.  To dress it up, I added a simple lemon buttermilk glaze to drizzle over the loaf, with some extra to drizzle on the slices.  This cake is so good as-is, but the glaze adds a little something that makes it feel extra special.  Adam could not get enough of the baby’s birthday cake, and I discovered that despite not being a frosting person, he loves glaze.  Who can blame him!

Now to the baby details!  We had a baby girl named Greta Rose.  She is an easy baby so far and super sweet.  Seems fitting I guess, because the same could be said about Lemon Buttermilk Cake! 🙂

easy lemon buttermilk breakfast pound cake with lemon glaze


Lemon Buttermilk Cake
 
Yields: 8 to 10 servings
Ingredients
  • 2 cups all-purpose flour
  • 2 teaspoons baking powder
  • ½ teaspoon salt
  • 1½ cups granulated sugar
  • ½ cup canola oil
  • ¾ cup buttermilk, well-shaken
  • 2 eggs
  • 1 tablespoon lemon zest (finely grated, approx 2 lemons)
  • ¼ cup lemon juice (approx 1½ lemons)
  • 1 teaspoon vanilla extract
  • Cooking spray
  • GLAZE:
  • 1 cup powdered sugar
  • 1½ tablespoons fresh lemon juice
  • 1 to 2 tablespoon(s) buttermilk, well-shaken
Instructions
  1. Preheat oven to 350 degrees. Spray 8"x4" loaf pan with baking spray and set aside.
  2. In a large bowl, whisk together flour, baking powder and salt.
  3. In a medium bowl, add the sugar, oil, buttermilk, eggs, zest, juice and vanilla and whisk to combine.
  4. Add buttermilk mixture to flour mixture and whisk to combine. Pour into prepared loaf pan.
  5. Bake for 65 to 75 minutes, or until a toothpick inserted into the center comes out clean. Let cool in pan for 15 minutes and then transfer to a wire rack to cool completely.
  6. To prepare glaze, in a small bowl, whisk the powdered sugar, lemon juice and buttermilk until well-blended. Drizzle over cooled cake, as desired.

Sources: Real Simple for the cake, Cooking Light for the glaze

Chipotle-Glazed Roast Chicken with Sweet Potatoes

baked chipotle chicken with roasted sweet potatoes


I found this recipe for Chipotle-Glazed Roast Chicken with Sweet Potatoes during a sleepless night over the summer.  While it sounded absolutely delicious, it didn’t quite scream “summer” to me…so I saved it for a more seasonably appropriate time.  After many months of anticipation, I am happy to report this recipe was definitely worth the wait!

First you give the potatoes a head start by cooking them until they start to get tender.  The timing on this may vary based on the size you cut your potatoes or your oven, but unless you like crunchy potatoes, this step is key to the success of the recipe.  Meanwhile, you can whip up the sauce/rub and prepare the chicken.  Then you just put the chicken on top of the potatoes and pop it in the oven to bake until the chicken is done.  This recipe really could not be any simpler.  The result is a light and healthy dish that is sweet, spicy and delicious!

Chipotle-Glazed Roast Chicken with Sweet Potatoes
 
Yields: 4 servings
Ingredients
  • 2 sweet potatoes (10 ounces each) cut into ½-inch cubes
  • 2 tablespoons olive oil
  • 4 chipotle chiles in adobo sauce, minced
  • 2-3 garlic cloves, minced
  • 2 tablespoons honey
  • 2 teaspoons cider vinegar
  • 1 teaspoon salt, plus additional to taste
  • 1 teaspoon cumin
  • ½ teaspoon cinnamon
  • 1 pound boneless skinless chicken breasts, cut into 4 4-ounce portions
  • 2-3 green onions, chopped (optional, for garnish)
  • Cooking spray
Instructions
  1. Preheat oven to 400 degrees. Spray a roasting or baking pan with cooking spray and set aside.
  2. In a medium bowl, toss sweet potatoes with olive oil and pour in the bottom of roasting/baking pan. Roast for 15 to 20 minutes (tossing after 10 minutes), until potatoes being to get tender.
  3. Meanwhile, in a small bowl, combine chiles, garlic, honey, vinegar, salt, cumin, and cinnamon. Rub mixture over chicken breasts.
  4. Place chicken breasts on top of sweet potatoes and roast until chicken is cooked thoroughly, about 25 to 30 minutes. Serve garnished with green onions.

Adapted from Fitness Magazine

Apricot White Chocolate Scones

lighter dried apricot white chocolate chip scones


Happy New Year!  For a special New Year’s Day breakfast, I made these Apriot White Chocolate Scones.  I always forget how quick and easy scones are to make, plus they are much more economical to make at home than to buy them from a local coffee shop.  Tastier too!  The slight tartness of the dried apricots and the sweetness of the white chocolate chips are such a wonderful complement.  I made several changes to the original recipes to lighten it up a bit:  used fat free evaporated milk instead of half and half, used light butter and also replaced some flour with whole wheat pastry flour.  The result was a delicious scone with a nice, moist texture (no dry scones here!).

Apricot White Chocolate Scones
 
Yields: 8 scones
Ingredients
  • 1 cup all-purpose flour
  • ¾ cup whole wheat pastry flour
  • ¼ cup packed brown sugar
  • 2 teaspoons baking powder
  • ⅓ cup cold butter, cut in pieces (I used light butter)
  • ⅓ cup chopped dried apricots
  • ⅓ cup white chocolate baking chips
  • 1 egg
  • ⅓ cup fat free evaporated milk
  • melted white chocolate and additional chopped apricots, for topping (optional)
Instructions
  1. Preheat oven to 400 degrees. Line a cookie sheet with parchment paper and set aside
  2. In a food processor, pulse flours, sugar and baking powder until combined.
  3. Add butter to food processor and pulse until fine crumbs form. Pour mixture into a medium bowl.
  4. Stir apricots and white chocolate chips into flour mixture. Stir in egg and gradually add evaporated milk until dough forms a ball (Note: You may need slightly less than ⅓ cup). Knead dough a few times while in bowl.
  5. Pat or roll dough into 8-inch round on prepared cookie sheet. Cut into 8 wedges (a pizza cutter works well) but DO NOT separate.
  6. Bake for 15 to 20 minutes, or until golden brown and a toothpick inserted in the center comes out clean. Let sit on pan for 5 minutes and then separate wedges (Note: I used a serated knife to ensure clean cuts). Let cool completely.
  7. Optional set: Drizzle melted white chocolate and sprinkle with chopped dried apricots, if desired.


Slightly adapted from Betty Crocker

cream cheese cookies with lemon glaze

Cream Cheese Meltaways

cream cheese meltaways with lemon glaze

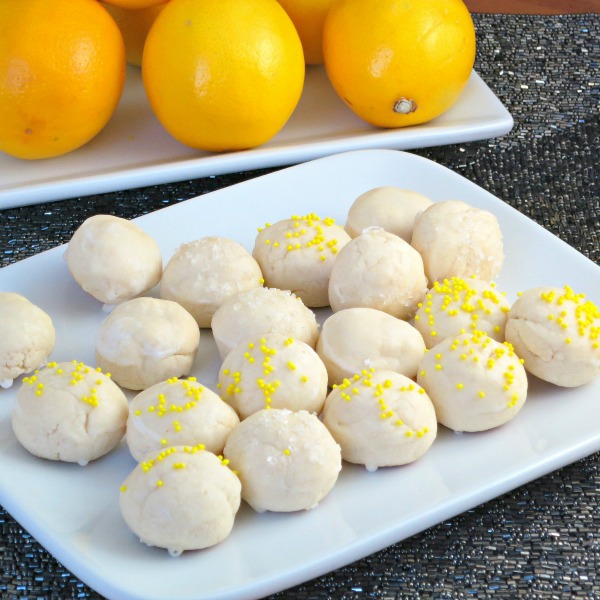
Cream Cheese Meltaways with Lemon Glaze are little bite-sized cookies that are a light and delicious addition to any holiday cookie platter.  These cookies were a new addition this year, and they were an instant favorite!  The lemon glaze gives just a hint of lemony sweetness to the cream cheesy butter cookies.  The recipe for glaze makes plenty.  You could probably get by with using half the glaze recipe, or better yet – double the cookie recipe…these will go fast!

Cream Cheese Meltaways
 
Yields: 36 cookies
Ingredients
  • 1¼ cups all-purpose flour
  • ½ cup cornstarch
  • ⅛ teaspoon salt
  • 1 cup powdered sugar
  • ½ cup butter, softened (I used light butter)
  • 2 ounces block-style Neufachtel cream cheese (1/3 less fat/light)
  • 1 teaspoon vanilla
  • Glaze:
  • 1¾ cups powdered sugar
  • ¼ cup fresh lemon juice
  • assorted sprinkles, for decorating (optional)
Instructions
  1. Preheat oven to 375 degrees. Line cookie sheets with parchment paper and set aside.
  2. In a medium bowl, whisk flour, cornstarch and salt until combined.
  3. In a large bowl, add powdered sugar, butter, cream cheese and vanilla and beat at medium speed until light and fluffy.
  4. Add flour mixture to butter mixture, stirring until combined. (Note: dough will be dry and crumbly).
  5. Shape dough into 1-inch balls (be careful not to overwork dough) and place on prepared cookie sheets.
  6. Bake for 8 to 10 minutes, or until bottoms of cookies are lightly browned. Cool 5 minutes of pan and then move to wire rack to cool completely.
  7. GLAZE: In a medium bowl, whisk powdered sugar and lemon juice until smooth. Dip the tops of cooled cookies into glaze and place on wire rack. Decorate with sprinkles, as desired. Let cookies stand until glaze is set.

Source:  Cooking Light

cream cheese meltaways from Alida's Kitchen

Chewy Ginger Cookies

Chewy Ginger Cookies

Chewy Ginger Cookies

This is my favorite recipe for Chewy Ginger Cookies. They are soft, chewy, with warm flavors of ginger and molasses, plus they take 10 minutes to prepare!

When it comes to holiday baking, I enjoy trying new recipes, but I also like to have some go-to recipes.   Standby recipes that are guaranteed to be crowd pleasers and are easy to make.  For years, I have been trying to find that special recipe for a ginger cookies.  These Chewy Ginger Cookies are the top contender for becoming that special recipe.  They are super soft and chewy with the warm flavors of ginger and molasses in each bite.   The dough takes less than 10 minutes to make, which is always a bonus!

This marks the final week of the 12 Weeks of Christmas Treats hosted by Meal Planning Mom.  Be sure to check out the thumbnails at the bottom of this post for more delicious holiday treats!

Chewy Ginger Cookies
 
Yields: 30 cookies
Ingredients
  • ½ cup butter, softened
  • ½ cup granulated sugar
  • 2 cups all-purpose flour
  • ½ teaspoon baking soda
  • ½ teaspoon ground ginger
  • ¼ teaspoon cinnamon
  • ¼ teaspoon salt
  • ½ cup molasses
  • ¼ cup water
  • Additional sugar, for rolling
Instructions
  1. In a medium bowl, whisk together flour, baking soda, ginger, cinnamon and salt.
  2. Mix molasses and water in a liquid measuring cup, and stir until combined (Note: you may need to stir again before adding to butter mixture).
  3. In a large bowl, cream butter and sugar until combined. Beating on low, alternately add flour mixture and molasses mixture to the butter mixture, until fully combined. Refrigerate for at least 2 hours to overnight.
  4. Preheat oven to 350 degrees. Line cookie sheets with parchment paper and set aside.
  5. Roll a rounded tablespoonful of dough into a ball and then roll the ball in granulated sugar. Place on prepared baking sheet. Bake for 12 to 14 minutes or until edges are set (be careful not to overbake). Remove to wire rack to cool completely.

Slightly adapted from Taste of Home: Best Loved Cookies and Bars


We are to Week #12 of the 12 Weeks of Christmas Treats hosted by Meal Planning Magic. Be sure to check out all the other bloggers who are participating this week in the 12 Weeks of Christmas Treats blog hop.