Categories

easy vegetarian spinach manicotti with no boil noodles

Easy Meatless Manicotti

Easy Meatless Manicotti | alidaskitchen.com


I don’t know about you, but I am very excited for Fall.  It is my favorite time of year for cooking and baking, plus I love the cooler temperatures.  Even though the season has not technically changed, Labor Day is kind of an unofficial kick off to the Fall season.  At least that’s what I’m telling myself.  I have already made a pumpkin pie, pumpkin pancakes, chili and cornbread, beef stew, and a few other Fall-inspired goodies to be posted soon.  (Ok, confession…I may have done some of this before Labor Day).

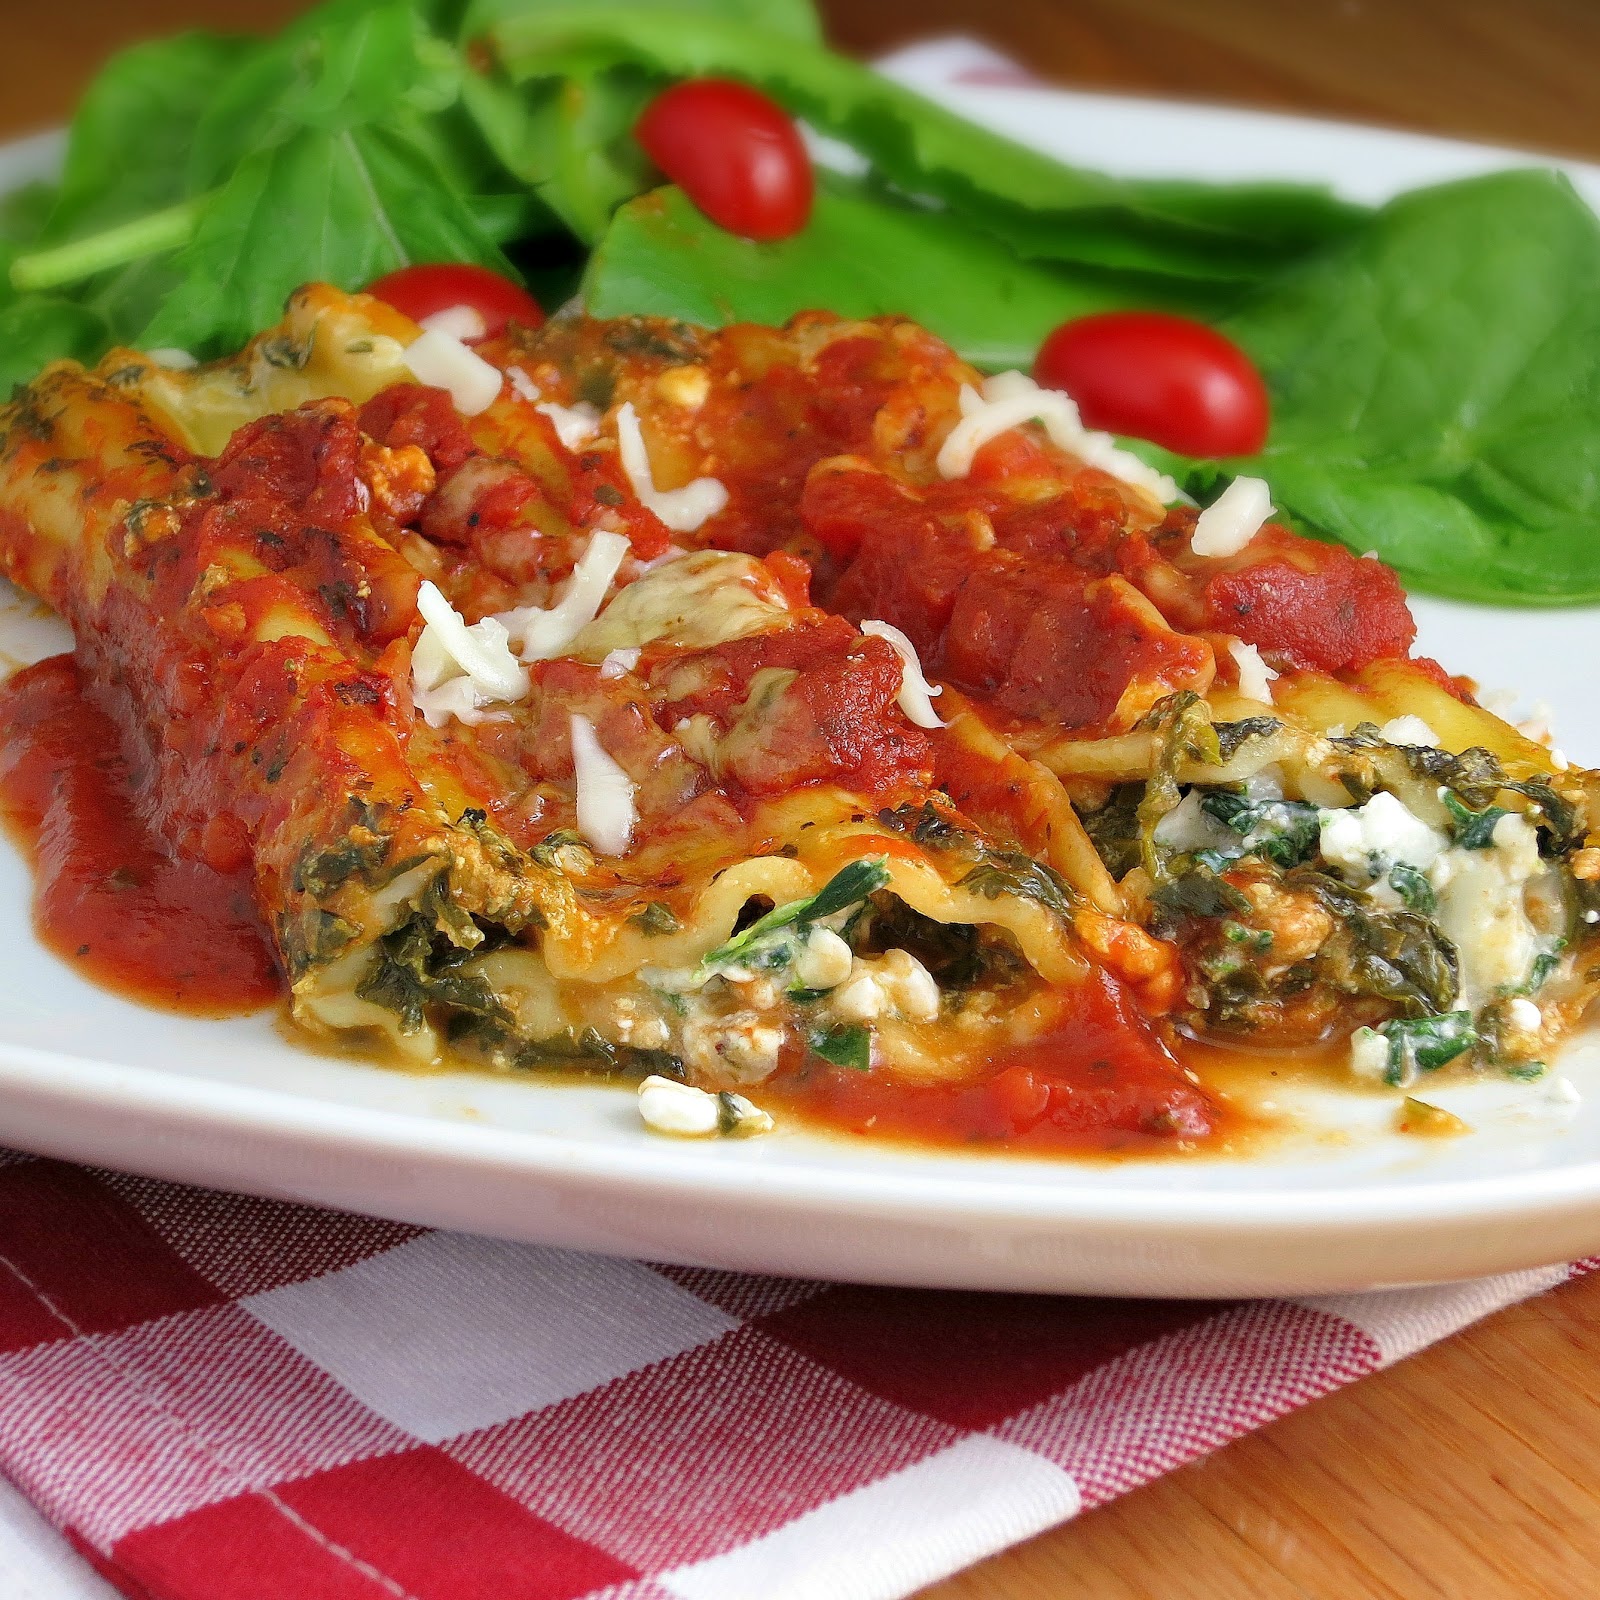
In any case, this Easy Meatless Manicotti is one of my favorite dishes and is a perfect comfort food for the cooler temperatures.  There are a couple time-saving steps in this recipe to help make it “easy.”   First, no boiling of the noodles is required.  Not having to boil the noodles is not only a time-saver, but filling firm shells is a whole lot easier than flimsy cooked shells.  This recipe also uses a jarred pasta sauce, though if you want to make your own, go for it!  The filling is very flexible – I’ve used cottage cheese or ricotta, and either works fine.  I have used frozen broccoli in place of the spinach; I have added onions, shredded zucchini, whatever extra vegetables that needs to be used up.  Leftovers heat up beautifully, which make for great lunches or quick dinners.  Easy Meatless Manicotti is healthy and delicious and a regular in our dinner rotation.

easy vegetarian spinach manicotti with no cook noodles

Easy Meatless Manicotti
 
Yields: 7 servings
Ingredients
  • 2 cups (8 ounces) shredded part-skim mozzarella, divided
  • ¼ cup (1 ounce) grated parmesan cheese
  • 16 ounces nonfat cottage cheese
  • 10 ounces frozen spinach, thawed and squeezed dry
  • 3 garlic cloves, grated or minced
  • 1½ teaspoons dried Italian herb seasoning (or dried oregano)
  • ¼ teaspoon crushed red pepper flakes
  • Salt and Pepper, to taste
  • Cooking Spray
  • 3 cups marinara sauce (or 24-28 ounce jar pasta sauce)
  • 1 package (14 noodles) manicotti noodles - uncooked
  • ½ cup water
Instructions
  1. Preheat oven to 375 degrees.
  2. In a large bowl, combine 1½ cups mozzarella, Parmesan, and cottage cheese, along with the spinach, garlic, Italian herb seasoning, red pepper and salt/pepper to taste.
  3. Spray 13 x 9 baking dish with cooking spray. Pour ½ of the sauce in the baking dish.
  4. Fill the manicotti noodles* with filling mixture until full, about 3 tablespoons.
  5. Pour the remaining sauce over the noodles, making sure the noodles are covered.
  6. Slowly pour ½ cup water around the perimeter of baking dish. Sprinkle remaining ½ cup mozzarella cheese on top. Cover with nonstick foil (or spray foil with cooking spray) and bake for 1 hour. Let sit uncovered for 10 minutes and serve.
Notes
Filling tips: Put filling in a ziploc bag, cut off a corner and fill shells OR I have found an iced tea spoon is the perfect size for spooning the filling in the shells.
Nutrition Information
Serving size: 2 shells


Adapted from Cooking Light

healthy carrot zucchini bread

Carrot Zucchini Bread

Carrot Zucchini Bread | alidaskitchen.com #recipes
Carrot Zucchini Bread is a moist, delicious twist on zucchini bread.  If you have extra zucchini, this is definitely a must-make!

The end of summer is one of my favorite times of year because it means zucchini is everywhere.  Zucchini is such a versatile vegetable that gets turned into delicious dishes, both savory and sweet, with so many possibilities!  I found myself with some zucchini and some leftover carrots from making Carrot Cake Pancakes.  My first instinct was to make pancakes (which might come later), but Carrot Zucchini Bread has been on my list for quite a while.  A quick bread with double veggies has got to be a good thing.  Carrot Zucchini Bread is a super tasty, fun twist on zucchini bread!

Carrot Zucchini Bread
 
Yields: 1 loaf (12 servings)
Ingredients
  • 1½ cups all-purpose flour
  • 2 teaspoons baking powder
  • ½ teaspoon baking soda
  • 2 teaspoons cinnamon
  • 2 eggs
  • ½ cup canola oil
  • ¾ cup brown sugar
  • 1 teaspoon vanilla extract
  • 1¾ cup grated zucchini (squeeze out some excess moisture)
  • ½ cup grated carrot
Instructions
  1. Preheat oven to 350 degrees. Grease a 8x4 loaf pan (or spray with baking spray) and set aside.
  2. In a medium bowl, whisk flour, baking powder, baking soda and cinnamon.
  3. In a large bowl, whisk eggs and oil until well blended. Add sugar and vanilla, and whisk until combined. Add zucchini and carrot, stirring until combined.
  4. Add flour mixture to zucchini mixture, gently folding until just combined.
  5. Pour mixture into prepared loaf pan and bake for 50 to 60 minutes, or until a toothpick inserted in the center comes out clean. Let cool in pan for 5 to 10 minutes and then move to wire rack to cool completely.

Adapted from Food.com

Carrot Zucchini Bread | alidaskitchen.com #recipes

healthy buttermilk banana bread pancakes

Banana Bread Pancakes

healthy buttermilk banana bread pancakes

I love having extra bananas around the house because inevitable it means they will be made into something yummy.  In this instance, I turned them into Banana Bread Pancakes.  I have been looking for a good banana pancake recipe for years and, as usual, have never found what I was hoping for.  I decided to modify my go-to pancake base recipe, mix a few things up, go heavy on the bananas and see what happens.  The result are a healthy banana pancake that tastes just like banana bread.   They are delicious plain (that’s how Adam likes them) but for myself, I whipped up a little cream cheese drizzle from my Carrot Cake Pancakes.  No matter how you top them, these Banana Bread Pancakes are simply delicious.  Adam also gives his official toddler seal of approval, which is always a win in my book!


Banana Bread Pancakes
 
Yields: 4 servings
Ingredients
  • 1½ cups whole wheat pastry flour (or all-purpose flour)
  • 2 tablespoons brown sugar
  • 1½ teaspoons baking powder
  • ½ teaspoon baking soda
  • 1 teaspoon cinnamon
  • ¼ teaspoon salt
  • 1 cup low fat buttermilk
  • 2 eggs, lightly beaten
  • 1 tablespoon vanilla extract
  • 1 tablespoon oil
  • 3 to 4 overripe bananas, mashed (approx 1½ cups)
  • Cooking spray
Instructions
  1. In a large bowl, whisk flour, sugar, baking powder, baking soda, cinnamon and salt.
  2. In a separate bowl, whisk the buttermilk, eggs, vanilla, oil and mashed bananas until well-blended.
  3. Add flour mixture to banana mixture, stirring gently until just moistened (batter may be lumpy). Let batter sit for about 10 minutes.
  4. Preheat nonstick skillet to medium heat and spray with cooking spray.
  5. Spoon batter onto skillet by the 2 tablespoonfuls to ¼ cupful, depending on desired size (Note: If batter is a little thick, use the back of your spoon to spread/shape the pancakes). Cook for 3 to 4 minutes, or until bubbles form and the edges look set. Flip pancakes and cook for another 2 to 3 minutes, or until golden.


Strawberry Banana Pancakes

We recently picked up several pounds of strawberries from a local farm, and I’m chipping away at my long list of things to make.  At the top of the list was pancakes, but not just any strawberry pancakes… Strawberry Banana Pancakes!  I searched online for inspiration and found nothing, so I decided to just make something up.  I took my standard pancake base recipe, combined it with my Strawberry Vanilla Pancakes and added some banana.  The result is a Strawberry Banana Pancake made with a buttermilk pancake base, a good dose of vanilla, and a generous amount of chopped strawberries and mashed bananas.  Such a delicious combination!

I never thought my little Adam would ever love any pancake more than Cottage Cheese Pancakes.  Well, after making these Strawberry Banana Pancakes, I stand corrected.  He devoured 4 pancakes with impressive speed and has been asking about them ever since.

Strawberry Banana Pancakes
 
Yields: 4 servings
Ingredients
  • 1½ cups whole wheat pastry flour (or all-purpose flour)
  • 1 tablespoon brown sugar, packed
  • 1½ teaspoons baking powder
  • ½ teaspoon baking soda
  • ¼ teaspoon salt
  • 1¼ cups low fat buttermilk
  • 2 eggs, lightly beaten
  • 2 tablespoons vanilla extract
  • 2 cups diced strawberries
  • 2 mashed bananas (about 1 cup)
  • 1 tablespoon oil
  • Cooking spray or addtional oil, for pan
Instructions
  1. In a large bowl, whisk flour, sugar, baking powder, baking soda, and salt.
  2. In a separate bowl, whisk the buttermilk, eggs, vanilla, oil and mashed bananas until well-blended.
  3. Add flour mixture to banana mixture, stirring gently until just moistened (batter may be lumpy) and then fold in strawberries. Let batter sit for about 10 minutes.
  4. Preheat nonstick skillet to medium heat and spray with cooking spray.
  5. Spoon batter onto skillet by the 2 tablespoonfuls to ¼ cupful, depending on desired size. Cook for 3 to 4 minutes, or until bubbles form and the edges look set. Flip pancakes and cook for another 2 to 3 minutes, or until golden.


Flourless Peanut Butter Cookies

three ingredient gluten free peanut butter cookies without flour

I was flipping through one of my holiday cookie publications recently, when I stumbled upon a recipe for Flourless Peanut Butter Cookies.  Made with no flour and only 3 simple ingredients, I was intrigued by how seemingly easy these cookies were.  Not only are these Flourless Peanut Butter Cookies easy to make, they are super tasty too.  I was pleasantly surprised at how something so simple can be so incredible!  The result is a soft and chewy cookie that is perfectly peanut buttery.  While perfect as-is, a cup of chocolate chips or chopped peanuts would be a delicious addition to this recipe.

Flourless Peanut Butter Cookies
 
Yields: 24 cookies
Ingredients
  • 1 cup natural peanut butter (chunky or creamy)
  • ¾ cup brown sugar, packed
  • 1 egg, lightly beaten
Instructions
  1. In a large bowl, beat peanut butter, sugar and egg together until blended. Put in the refrigerator for at least 30 minutes to firm up the dough.
  2. Preheat oven to 350 degrees. Line cookie sheets with parchment.
  3. Drop dough by tablespoonful onto prepared cookie sheet and flatten with the tines of a fork, creating a cross-hatch pattern. (Tip: It is helpful to spray fork with cooking spray to keep it from sticking to cookie).
  4. Bake for 8 minutes (Note: Be careful not to overbake, otherwise it will result in a crisper cookie). Let cool on cookie sheet for 10 minutes and then move to a wire rack to cool completely.

Adapted from Taste of Home: Holiday Cookies

Chipotle Macaroni and Cheese

Chipotle Macaroni and Cheese is a delicious, cheesy, veggie-filled baked pasta with a Mexican twist.  It is made with three different cheeses (yum!) and lots of vegetables (yum!).  The chipotle chiles add a nice smokiness and spice which, along with the chili powder, balance nicely with the tomatoes and cheeses.  Black beans give a protein and fiber boost while adding a nice color contrast to the rest of the dish.  A traditional breadcrumb topping is sprinkled over the top before baking.

Chipotle Macaroni and Cheese is very easy to prepare and the result is no ordinary mac ‘n cheese, that’s for sure. This recipe makes plenty, and the leftovers heat up nicely for lunches the next day.

Chipotle Macaroni and Cheese
 
Yields: 6 servings
Ingredients
  • 2 cups dry whole wheat elbow macaroni (or other short pasta)
  • 1 tablespoon canola oil
  • 2 chipotle chiles in adobo sauce, chopped
  • 1 yellow onion, chopped
  • 1 bell pepper, chopped
  • 2 garlic cloves, minced
  • 2 tablespoons all-purpose flour
  • 1 teaspoon chili powder (adjust to taste)
  • 1 (14½ ounce) can diced tomatoes with green chiles, including juices
  • 1 teaspoon adobo sauce (from can of chipotle chiles)
  • 2 cups (8 ounces) shredded sharp cheddar cheese
  • 1 cup nonfat cottage cheese
  • 1 cup skim milk
  • ¼ cup (1 ounce) grated fresh Parmesan cheese
  • 1 egg, lightly beaten
  • 1 (15 ounce) can black beans, rinsed and drained
  • Cooking spray
  • 3 tablespoons dry breadcrumbs
Instructions
  1. Preheat oven to 350 degrees. Cook pasta according to package directions, omitting fat and salt.
  2. In a large pot, heat oil over medium high heat. Add chiles, onion, and bell pepper, and cook 4 minutes, or until onion is tender. Add garlic and cook 1 minute, or until garlic is fragrant, stirring frequently.
  3. Sprinkle with flour and chili powder, and cook 30 seconds, stirring constantly.
  4. Reduce heat to medium and add tomatoes. Cook for 3 minutes, or until mixture is thickened.
  5. Add adobo sauce, cheddar cheese, cottage cheese, milk, Parmesan and egg, stirring until combined and cheese is melted. Add cooked pasta and black beans, stirring until combined.
  6. Spray a 2-quart baking dish with cooking spray. Pour pasta mixture into prepared baking dish. Top with bread crumbs. Bake for 30 minutes or until bubbly.

Adapted from Cooking Light

Guacamole Grilled Cheese Sandwich

kraft singles guacamole grilled cheese sandwich

Cheese has always been one of my favorite foods.  As a child I remember sneaking some cheese whenever my mom was in the kitchen, or simply grabbing a Kraft Single on my way out to play.  I also remember my mom always made my brother a ham and cheese sandwich using Kraft Singles, but I liked my cheese plain.  That is…until I discovered the grilled cheese sandwich.  Melty cheese on bread?  So simple yet so delicious!

When I went to college and had my own apartment, I started experimenting with grilled cheese sandwiches.  It was around this time when I noticed Kraft Singles came in more varieties than American, and I was very excited to see they came in Swiss!  I made a tasty little combo with a slice of cheddar, a slice of Swiss, some sauteed onions, all on multi-grain bread.  Grilled cheese perfection every time.  Oh…the memories!

That was all many years ago, yet my love for experimenting with grilled cheese sandwiches continues to this day.  Mike and I like to mix it up with tomatoes, sunflower seeds, onions, bacon (for him)…really nothing too crazy, but always tasty.  This time, I thought it would be fun to experiment with guacamole and make a Guacamole Grilled Cheese Sandwich.

For a while now, I have had a recipe flagged for a grilled cheese made on the stove top and in the oven, without any butter.  This sounded like the perfect method for the Guacamole Grilled Cheese Sandwich.  The result?  Amazing!  The stove-to-oven method gives the bread a crispy exterior without any frying or being greasy.  The cheese is perfectly melted, and the guacamole can shine right through.  This Guacamole Grilled Cheese Sandwich is a fun and tasty twist on a childhood favorite.

Do you have childhood memories or a family story to share about Kraft Singles?  You can share your story at https://www.facebook.com/KraftSingles. Put your story on the map and join the conversation about Kraft Singles!

Guacamole Grilled Cheese Sandwich
 
Yields: 1 sandwich
Ingredients
  • 2 slices whole grain bread
  • 2 to 3 tablespoons guacamole, any variety, such as Edamame Guacamole
  • 1 or 2 slices Kraft Singles 2% Sharp Cheddar
  • Cooking Spray
Instructions
  1. Preheat oven to 375 degrees. Line a baking sheet with parchment and set aside.
  2. Spread guacamole evenly on one side of each slice of bread.
  3. Place a Kraft Single cheese slice on top of the guacamole on each slice of bread, and then flip to make a sandwich (so cheese on cheese).
  4. Heat a nonstick skillet over medium heat and spray with cooking spray. Place sandwich in pan for about 1 to 2 minutes or until bread is toasted. Flip and repeat on the other side.
  5. Transfer sandwich from skillet to the prepared baking sheet. Bake for 3 to 5 minutes, or until cheese is melted. Remove from oven, cut in half and serve immediately.

Disclaimer:  As part of the Foodbuzz Tastemaker Program, I received a coupon for free Kraft Singles and a stipend.

Smoked Gouda Baked Pasta with Broccoli

smoked gouda macaroni and cheese with broccoli

I recently made an old favorite frittata recipe using smoked Gouda cheese.  The good thing about smoked Gouda is that it is so flavorful, a little goes a long way.  That also means that whenever I purchase a block for a specific recipe, there is usually some leftover.  Not a bad problem to have, that’s for sure.  This time I decided to put it to use with a fun twist on a classic ~ Smoked Gouda Baked Pasta with Broccoli.  Who doesn’t love fancy, new versions of macaroni and cheese!

The first time I made macaroni and cheese with smoked Gouda, it was really tasty, but there was something missing.  The smoked Gouda wasn’t as pronunced as I had hoped.  So after experimenting with some seasoning, I found a little paprika was the key.  It really brought out the smoked Gouda flavor.  The broccoli was also a nice addition to this dish, giving a nutrition boost while adding some texture and color.  One can never have too many mac ‘n cheese recipes, and this version is definitely a keeper!

Smoked Gouda Baked Pasta with Broccoli
 
Yields: 4 servings
Ingredients
  • 8 ounces short pasta (such as elbows, penne, rotini)
  • ½ cup bread crumbs
  • 1 teaspoon olive oil
  • 1 cup yellow onion, chopped
  • 2-3 garlic cloves, minced
  • 2 tablespoons all-purpose flour
  • 2 cups skim milk
  • ½ teaspoon paprika
  • ½ teaspoon ground dry mustard
  • ½ teaspoon salt
  • ¼ teaspoon black pepper
  • ½ cup (2 ounces) smoked Gouda cheese, shredded
  • ⅓ cup (about 1½ ounces) grated fresh Parmesan cheese
  • 12 ounces frozen broccoli florets, thawed and lightly chopped
  • Cooking spray
Instructions
  1. Preheat oven to 350 degrees.
  2. Cook pasta according to package instructions. Set aside.
  3. In a large saucepan, heat oil over medium heat. Add onion and cook until softened (about 5 to 7 minutes). Add garlic and saute for 1 minute. Add flour and cook, stirring constantly, until lightly toasted (about 1 minute).
  4. Gradually add milk, paprika, mustard, salt and pepper, whisking constantly. Bring to a boil, and then cook until thickened (about 2 to 3 minutes).
  5. Add cheeses to milk mixture, stirring until melted and then remove from heat.
  6. Add broccoli and cooked pasta to the cheese sauce, stirring until well-blended.
  7. Pour into a 2-quart baking dish coated with cooking spray. Sprinkle with breadcrumbs.
  8. Bake uncovered for 15 minutes, or until bubbly.

Adapted from Cooking Light

Sweet Potato and Black Bean Enchiladas

healthy mexican sweet potato and black bean enchiladas

Sweet potatoes and black beans are two of my favorite foods, though the thought of combining the two had me wondering.  I like my sweet potatoes plain and my black beans spicy…would they be good together?   When I came across a recipe for Sweet Potato and Black Bean Enchiladas, they looked so good, I had to to give it a try.  And I’m so glad!  Whoever decided to put these two flavors together in a tasty Mexican-inspired dish is pure genius.  The sweetness and spicy pair beautifully in this dish, and the queso fresco rounds everything out quite nicely.

I like that you can make the sauce and/or filling ahead of time, since they are the most labor intensive (by labor, I mean time to stand over the stove…they’re really quite easy).  Assembly is a cinch, and then bake until warmed throughout and the cheese is all bubbly.  This recipe makes a lot, which is a very good thing ~ leftovers heat up perfectly!

Sweet Potato and Black Bean Enchiladas
 
Yields: 8 servings
Ingredients
Sauce:
  • 1 15 ounce can tomato sauce
  • 1⅓ cups low-sodium vegetable broth
  • 2 teaspoons chili powder
  • 1 teaspoon garlic powder
  • 1 teaspoon onion powder
  • ½ teaspoon chipotle chile powder
  • Salt and pepper, to taste
Filling:
  • 1 tablespoon canola oil
  • 1 small yellow onion, diced (1 cup)
  • 1½ pounds sweet potatoes, peeled and diced (3 cups)
  • 1 15 ounce can diced tomatoes, drained
  • 16 ounces prepared medium salsa
  • 3 cloves garlic, minced
  • 1 chipotle chile in adobo sauce, drained and minced
  • ½ cup vegetable broth (or water)
  • 15 ounce can black beans, rinsed and drained
  • 1 teaspoon cinnamon
  • 10 ounce round queso fresco, divided
  • Cooking spray
Enchiladas:
  • Cooking spray for baking dish
  • 16 16-inch corn tortillas warmed
  • 2 limes, cut into wedges
  • 1 avocado sliced (optional)
  • Sour cream (optional)
  • Cilantro (optional)
Instructions
  1. Make sauce: Whisk all ingredients in a medium saucepan over medium heat and bring to a simmer, stirring occasionally. Simmer until slightly thickened (about 3 to 4 minutes) and then remove from heat.
  2. Make filling: In a large saucepan, heat oil over medium heat. Add onion and saute until softened (about 5 minutes).
  3. Add sweet potatoes, tomatoes, salsa, garlic, chipotle chile, and broth. Bring to a boil. Reduce heat to medium-low and simmer for 30 to 40 minutes, or until sweet potatoes are soft.
  4. Mash mixture with a potato masher until combined. Add black beans and cinnamon and cook for 5 minutes, or until black beans are heated throughout. Stir in 6 ounces of queso fresco and remove from heat.
  5. Assemble and bake: Preheat oven to 350 degrees. Spray 13x9 baking dish with cooking spray. Spread ½ cup sauce in bottom of dish. Fill warmed tortillas with filling (about ⅓ cup), roll and pack close together, seam-side down in baking dish. Top with remaining sauce and queso fresco. Bake 15 minutes.
  6. Broil: Adjust oven to broil and broil enchiladas for 5 minutes, or until cheese is browned and bubbly. Let sit for 10 minutes and then serve.

Adapted from Vegetarian Times

Mushroom and Leek Pita Pizzas

After a long day of work and play, it’s nice to have some healthy quick and easy meals ideas on hand.  These Mushroom and Leek Pita Pizzas fit that bill quite nicely.  Mushrooms and leeks are a delicious combination, and a little garlic and crushed red pepper give this pizza a little pizazz.  The whole wheat pitas serve as a sturdy crust.  Topped with some low fat ricotta and lots of vegetables, these pitas turned pizzas become a healthy dinner in less than 20 minutes.

Mushroom and Leek Pita Pizzas
 
Yields: 2 servings
Ingredients
  • Cooking spray
  • 1 cup leeks, sliced (approximately 1 leek)
  • 2 garlic cloves, sliced
  • 2 cups sliced mushrooms (5 ounces)
  • Coarse salt and fresh ground pepper, to taste
  • 2 whole wheat pitas
  • ¼ cup low fat ricotta cheese
  • 2 tablespoons Parmesan cheese, freshly grated
  • 2 teaspoons olive oil, for drizzling
  • Crushed red pepper flakes, to taste
Instructions
  1. Preheat oven to 425 degrees. Line a baking sheet with parchment paper and set aside.
  2. Spray large nonstick skillet with cooking spray and heat over medium heat.
  3. Add leeks and mushrooms and cook until tender, about 5 minutes. Add garlic and cook until golden, about 1 to 2 minutes (watch carefully to not over cook garlic). Season with salt and pepper.
  4. Place pitas on prepared baking sheet. Spreach each pita with 2 tablespoons ricotta cheese. Drizzle with 1 teaspoon olive oil, and top with vegetable mixture. Sprinkle with Parmesan cheese and red pepper flakes (if using).
  5. Bake until pita is golden and cheeses begin to melt, about 6 to 8 minutes. Serve immediately.

Adapted from Whole Living