Categories

easy vegetable frittata

Easy Vegetable Frittata

I Can't Believe It's Not Butter! Breakfast After Dark


Thank you I Can’t Believe It’s Not Butter! for sponsoring this post. Visit www.icantbelieveitsnotbutter.com for more information about Breakfast After Dark.

easy vegetable frittata

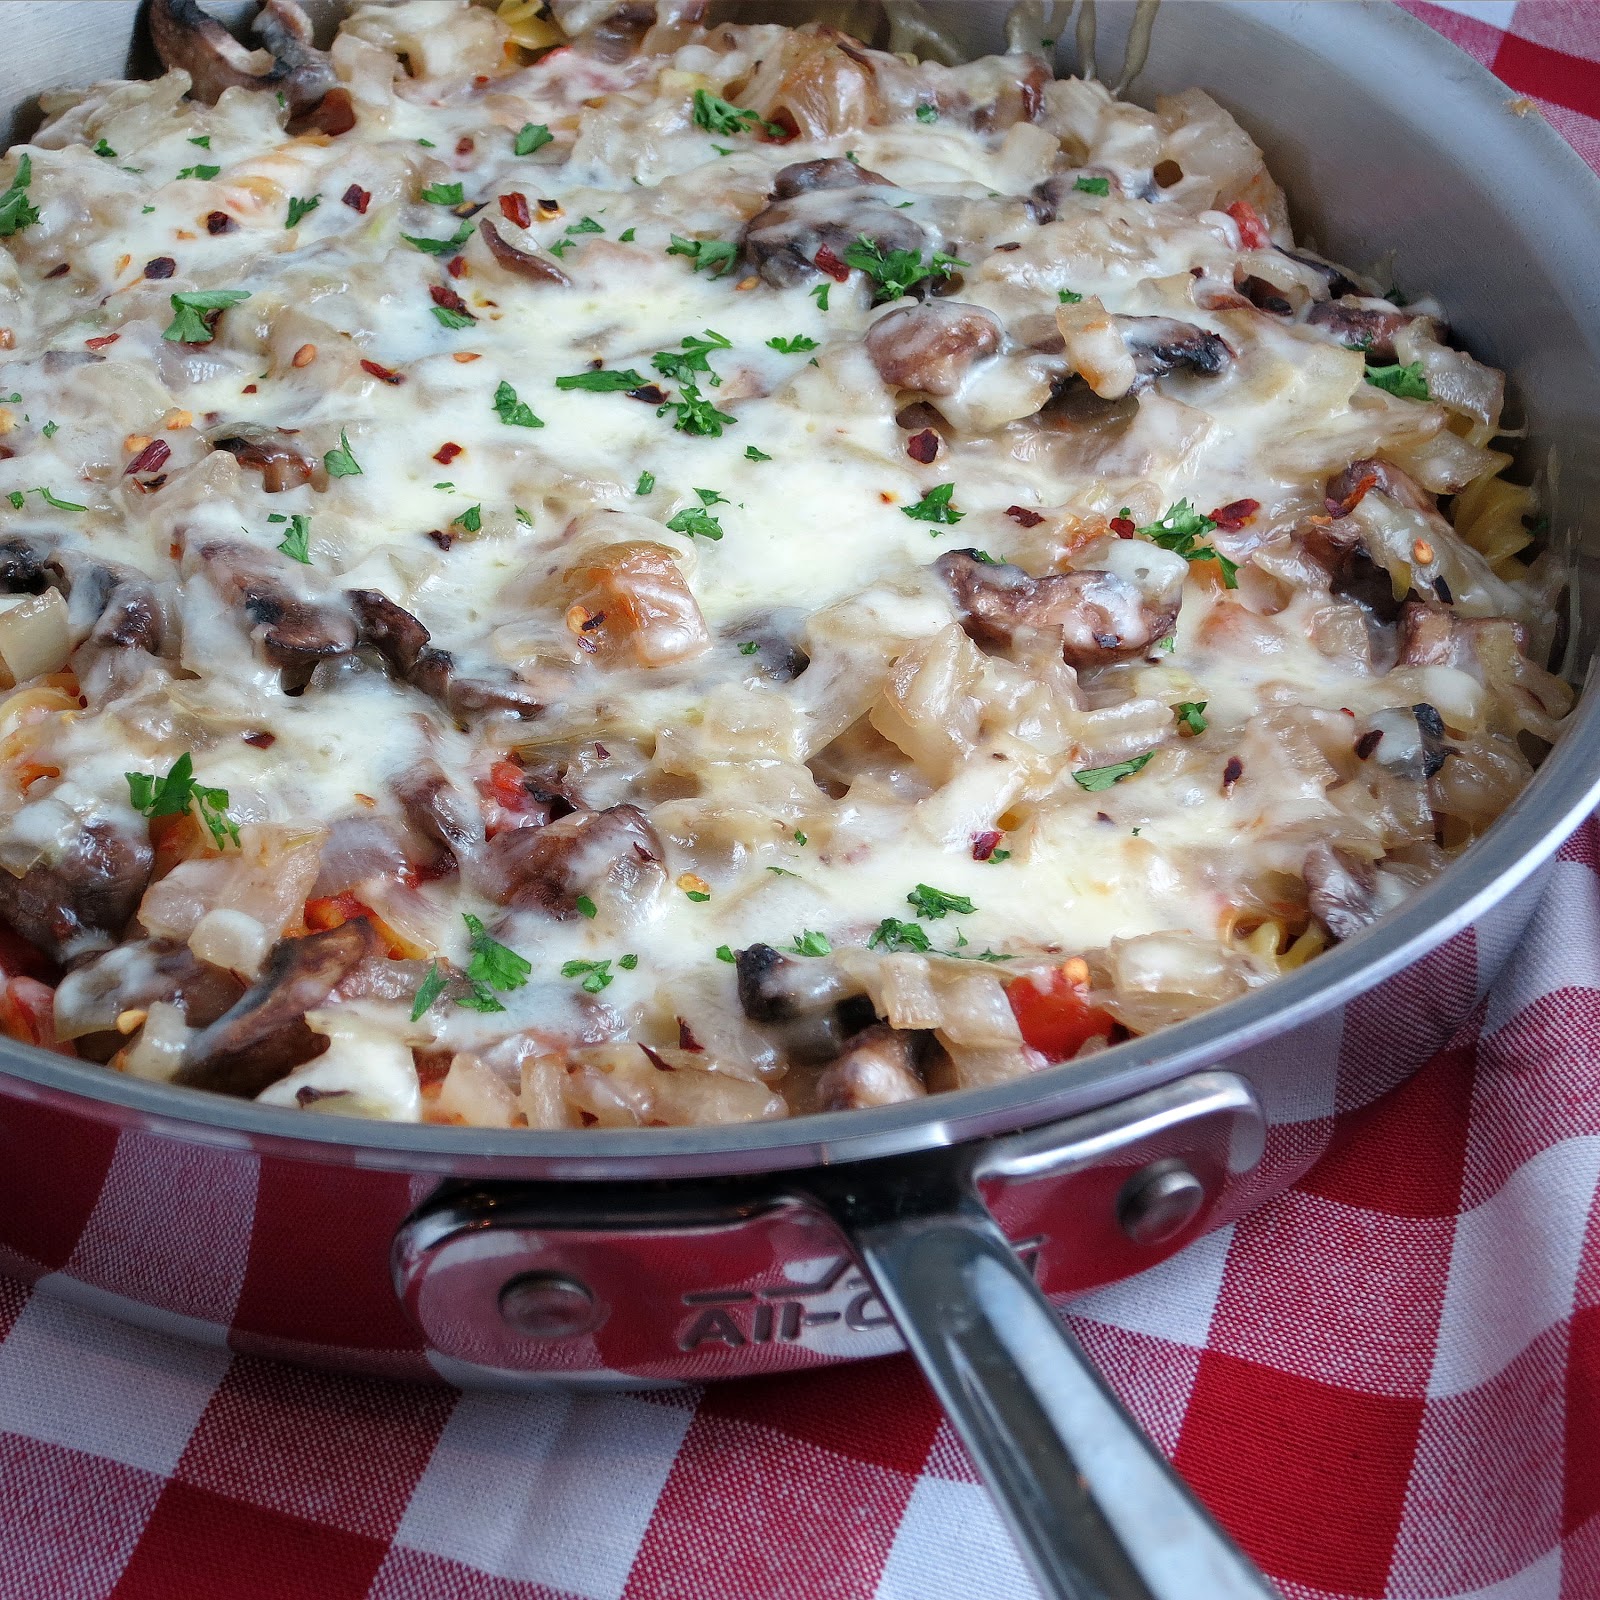
We love breakfast for dinner (or “brinner” as it’s often called), whether it’s waffles, pancakes, egg scrambles or frittatas.  This Easy Vegetable Frittata is a frequent “go-to” dinner because it’s quick, easy, and we can easily use up whatever vegetables or cheeses we have on hand.  Mike can make it too, which is another plus!

easy vegetable frittata

 In this frittata, for the veggies, I used sliced red pepper, chopped broccoli florets, chopped red onion, and some garlic, and I used cheddar for the cheese.  It was such a delicious combination and so colorful!  I paired my frittata with a mixed green side salad, because that’s generally what I have with any dinner.  Mike skipped the salad and enjoyed his with a beer ~ it is dinner after all!

With Mother’s Day just a few days away, this frittata would be an excellent dish to enjoy at your celebratory breakfast/brunch or for a breakfast for dinner.  Tomorrow I will be sharing another great brunch recipe…and it’s even easier to make!

easy vegetable frittata


Easy Vegetable Frittata
 
Yields: 4 to 6 servings
Ingredients
  • 2 tablespoons I Can't Believe It's Not Butter! spread, divided
  • 4½ cups sliced/chopped vegetables (I used red pepper, broccoli, onions)
  • 2 cloves garlic, minced
  • 1 teaspoon Italian seasoning
  • 8 eggs (or 4 eggs and 8 egg whites)
  • 1 cup shredded cheese, divided (I used cheddar)
Instructions
  1. In a large oven-proof nonstick skillet, melt 1 tablespoon I Can't Believe It's Not Butter! over medium heat. Add your vegetables and cook, stirring occasionally, until vegetables are tender (about 5 minutes). During the last minute, add minced garlic and Italian seasoning, stirring to combine.
  2. Meanwhile, melt the remaining tablespoon of I Can't Believe It's Not Butter!
  3. In a large bowl, whisk the eggs, melted I Can't Believe It's Not Butter! and 3 tablespoons water for about 1 minute, or until frothy. Stir in ½ cup cheese.
  4. Pour egg mixture over vegetables, stirring gently, and cook over medium heat until eggs begin to set. (Occasionally lift the edges of frittata to allow uncooked mixture to go to the bottom)
  5. Top with remaining cheese and broil for 2 minutes, or until cheese is melted and golden brown and eggs are set. Cut into wedges and serve.

Source: I Can’t Believe It’s Not Butter!


For  more tips about making this delicious frittata, check out the Breakfast After Dark Episode “Fabulous Frittata with Lisa Vanderpump

I was selected for this opportunity as a member of Clever Girls Collective and the content and opinions expressed here are all my own.

Mini Deep-Dish Pizzas made in a muffin tin

Mini Deep-Dish Pizzas

Individual deep dish muffin tin pizzas
Mini Deep-Dish Pizzas are fun, little individual deep dish pizzas made in a muffin tin.  First you roll out little pizza dough circles and then gently put them in the muffin cups.  Then fill each dough round with your desired sauce and toppings and then top it with cheese.   I used premade dough (from Trader Joe’s), topped them with a marinara sauce, broccoli, red onion and mozzarella cheese, and they came together in less than 30 minutes.  These Mini Deep-Dish Pizzas are completely customizable with your favorite sauce and toppings.  Mini Deep-Dish Pizzas are a definite crowd-pleaser. Besides – there is always something fun about anything in miniature!


Today I am being featured over at Momma’s Meals where I’m being featured as part of Tammi’s Featured Fridays series!  Every Friday, Tammi gets to know her fellow bloggers and makes one of their recipes to share with her family and then with her readers.

I thought it would be fun to make something from Tammi’s site to share with you, and her Individual Deep Dish Pizzas were perfect!  Incidentally I had been looking at an Everyday Food recipe for little deep dish pizzas made in a muffin tin, so these Mini Deep-Dish Pizzas that I’m sharing with you is sort of a combination of the two recipes.

Mini Deep-Dish Pizzas
 
Yields: 12 pizzas
Ingredients
  • Cooking spray
  • All-purpose flour, for rolling
  • 1 pound pizza dough (homemade or store-bought) - in 12 pieces
  • Salt and pepper
  • 1 cup pizza sauce (I used a homemade marinara sauce)
  • Your favorite pizza toppings - about 1 to 2 tablespoons per pizza (I used chopped broccoli and red onion)
  • 1 cup shredded part-skim mozzarella cheese
Instructions
  1. Preheat oven to 450 degrees. Spray 12 standard muffin cups with cooking spray. Set aside.
  2. On a lightly floured surface, roll out each piece of pizza dough into 6-inch circles. Place into prepared muffin cup, gently pressing dough into bottom and up the sides. Season with salt and pepper as desired.
  3. Put 1 tablespoon sauce in each dough cup. Top sauce with 1 to 2 tablespoons of pizza toppings and then top with cheese.
  4. Bake until dough is browned and crisp, approximately 12 minutes. Let cool for 2-5 minutes before removing from cups.


Sources:  Everyday Food,September, 2010 and Momma’s Meals

Buffalo Chicken Quinoa Salad | alidaskitchen.com

Buffalo Chicken Quinoa Salad

Buffalo Chicken Quinoa Salad is a delicious entree salad made with quinoa, broccoli, carrots, tossed with a healthier version of buffalo chicken. Quick and easy, perfect for a weeknight!
Buffalo Chicken Quinoa Salad | alidaskitchen.com
This Buffalo Chicken Quinoa Salad is darn near perfection.  We start with warm, shredded chicken tossed in a lighter buffalo sauce; add sautéed vegetables and combine it with the ever trendy (and tasty!) quinoa.  Sprinkle blue cheese (or cheddar) on top, as desired, and you’re looking at a delicious and healthy Buffalo Chicken Quinoa Salad.

Not only is this salad am-a-zing, but it can be made in under 30 minutes!  The quinoa and chicken cook simultaneously, allowing plenty of time to prepare and sauté the vegetables and whisk together the sauce.  Put it all together and dinner is served!  (Leftovers make great lunches too)

Buffalo Chicken Quinoa Salad | alidaskitchen.com

Buffalo Chicken Quinoa Salad
 
Yields: 3 to 4 servings
Ingredients
  • 1 cup quinoa, rinsed
  • 2 cups vegetable broth (or water)
  • 2 boneless, skinless chicken breasts (about 8 to 10 ounces) OR 2 cups shredded rotisserie chicken
  • 1 cup shredded carrots
  • 1 cup broccoli florets
  • 2 to 3 green onions chopped, whites and greens separated
  • Cooking spray
  • ½ cup hot sauce (I recommend Frank's hot sauce)
  • ¼ cup extra virgin olive oil
  • 1 tablespoon lemon juice
  • ½ teaspoon garlic powder
  • ½ teaspoon paprika
  • ¼ teaspoon onion powder
  • ¼ teaspoon salt
  • Optional toppings: blue cheese crumbles or shredded cheddar cheese
Instructions
  1. Make quinoa: In a medium sauce pan, put rinsed quinoa and vegetable broth and bring to a boil. Cover and reduce heat to a simmer for 15 to 20 minutes. Let sit for 5 minutes and then fluff quinoa with a fork.
  2. Poach chicken: While the quinoa is cooking, place chicken in medium pot, and add enough water to cover chicken. Bring to a boil, cover and reduce to a simmer; cook for 5 minutes. Remove pan from heat and let chicken stand, covered until cooked through (about 12 to 14 minutes). Remove chicken from liquid and shred with 2 forks.
  3. While quinoa and chicken are cooking, sauté the vegetables. Spray a nonstick skillet with cooking spray and heat over medium high heat. Add broccoli, carrots and the whites of green onions, and sauté for 5 minutes, or until desired crisp-tenderness. Set aside.
  4. Make the sauce: Whisk together hot sauce, oil, lemon juice, garlic powder, paprika, onion powder and salt.
  5. Pour ¼ cup sauce over shredded chicken, tossing to coat.
  6. To a large bowl, add quinoa, chicken and vegetables, tossing to combine (You can add remaining sauce with this step OR drizzle as desired over each individual serving).
  7. Sprinkle with remaining chopped green onion and serve.

Buffalo Chicken Quinoa Salad | alidaskitchen.com

I drew inspiration from this recipe and my Baked Buffalo Chicken Tenders recipe.

Baked Dorito-Crusted Chicken

baked dorito-crusted chicken | alidaskitchen.com


Baked Dorito-Crusted Chicken came to me in a dream, which is funny because I’m typically not a flavored chip person (except for salt ‘n vinegar…yum!)  I dismissed it as a quirky pregnancy dream.  That is, until we had a bag of cheese tortilla chips (remember my Green Giant post?), which were just asking to be paired with chicken.

Baked Dorito-Crusted Chicken tastes like…wait for it….yep, you guessed it.  Doritos and chicken.  And it’s really good!  The chicken is moist and juicy.  The salty, cheesy chips give a nice seasoning to the chicken as well.  We were very happy to finally turn my crazy dream into a delicious reality!

baked dorito-crusted chicken

Baked Dorito-Crusted Chicken
 
Yields: 2 servings
Ingredients
  • Cooking spray
  • 1 cup crushed cheese tortilla chips (or any chip will work here)
  • 1 egg, lightly beaten
  • 1 tablespoon milk (I used skim)
  • 2 boneless, skinless chicken breasts (4 to 5 ounces each)
Instructions
  1. Preheat oven to 425 degrees. Line a baking sheet with foil and spray baking sheet with cooking spray.
  2. Put crushed chips in a shallow bowl.
  3. In a separate shallow bowl, whisk egg and milk until combined.
  4. Dip chicken breasts in milk mixture and then dip in chips, coating the chicken. Place on prepared baking sheet and lightly spray tops with cooking spray.
  5. Bake for 15 to 18 minutes, or until chicken is thoroughly cooked.


homemade fig newtons

Oatmeal Fig Bars | Homemade Fig Newtons

oatmeal fig bars | homemade fig newtons
Oatmeal Fig Bars are a chewy, fig-filled bar made on the lighter side.  They taste pretty close to a Fig Newton, but homemade is always better, right?  When I was researching for a healthy fig bar recipe made with oatmeal, I was surprised to find there weren’t many (or rather any that were suitable).  So I decided to take the dough of a oatmeal date bar recipe and replace the date filling with a fig filling.  Because I wanted these to be healthier, I reduced the amount of sugar in the dough and eliminated added sugar from the filling.  In lieu of sugar, I added lemon juice and zest to the filling to brighten the flavor and also act as a thickener.  The result was just what I had in mind for a healthy fig bar, and they were also really simple to make.

When I was making these Oatmeal Fig Bars, I couldn’t help but think about my grandma and grandpa and chuckle.  I’ve talked many times about my grandma and what a wonderful baker she was.  While I’m sure my grandpa loved all of her (delicious!) baked goodies, he always had a stash of Fig Newtons in their pantry.  I really can’t blame him.  Not much beats a Fig Newton (except for these bars of course!.. but I digress).  I don’t think my grandma ever attempted to make a homemade variety of his beloved fig bars, but I’m sure they would have been similar to these…and my grandpa would have stashed these instead!

oatmeal fig bars | homemade fig newtons

Oatmeal Fig Bars | Homemade Fig Newtons
 
Yields: 16 bars
Ingredients
  • 1 cup chopped dried figs, stems removed (8 ounces)
  • ½ cup water
  • 1 tablespoon lemon juice
  • 1 teaspoon lemon zest
  • 1½ cups rolled oats (I used quick oats)
  • 1 cup all-purpose flour
  • ¾ cup packed brown sugar
  • ½ teaspoon baking soda
  • ¼ teaspoon salt
  • ⅓ cup butter, melted (I used light butter)
  • 1 egg white
  • Cooking spray
Instructions
  1. In a small sauce pan, put figs, water, lemon juice and zest, and bring to a boil. Simmer until mixture starts to thicken (about 3 minutes). Let cool for about 5 minutes.
  2. Put filling in food processor and process until smooth. Set aside.
  3. Preheat oven to 350 degrees. Spray a 8-inch baking pan with cooking spray and set aside.
  4. In a large bowl, whisk together oats, flour, sugar, baking soda and salt.
  5. Add butter and egg white to oat mixture and stir until combined.
  6. Press half of the oat mixture into the prepared baking pan. [Note: I used waxed paper to press and spread the mixture into the pan]. Next, carefully spread with fig mixture. Last, drop pieces of remaining oat mixture over the fig mixture so it appears crumbly and then gently pat it down [Note: I used waxed paper for this step].
  7. Bake for 20 to 25 minutes or until lightly browned. Cool on wire rack.

This marks the third installment of the Eating the Alphabet Challenge, hosted by Brenda of Meal Planning Magic.  This month we’re featuring healthy recipes using fruits, vegetables, grains or legumes that start with letters E or F.  This was a no-brainer for me.  I’ve been wanting to come up with a healthy Fig Bar recipe, so this was just the incentive I needed!

vegetarian spinach ravioli lasagna

Easy Ravioli Lasagna

Easy Ravioli Lasagna - takes 10 minutes to prepare using only 5 ingredients.  This is so good!
I am excited to share this recipe with you. Easy Ravioli Lasagna has become one of our favorite weeknight dinners!  It has the delicious flavor of lasagna yet is made with only 5 main ingredients and takes 10 minutes to prepare ~ perfect these days when I find myself juggling a newborn and a busy 3 year old at dinnertime.  This lasagna can also be made ahead (like before leaving for work or, in my case, before the kids wake up) so it’s ready to just pop in the oven at dinner.

Easy Baked Ravoli Lasagna

From the original recipe, I increased the sauce, added some red pepper flakes, and actually reduced the cheese (surprising for a cheese-lover like myself, but it was way too much and took away from the overall dish).  This Easy Ravioli Lasagna is made with spinach, but I think sautéed mushrooms and garlic would also be delicious.  We have made this several times, and it’s always a crowd-pleaser.  Speaking of crowds, this recipe can easily be doubled to fit a 13″x9″ lasagna pan and you’ll have enough to serve a crowd or have lots of leftovers for lunches.  It reheats beautifully!

Easy Ravioli Lasagna
 
Yields: 4 to 6 servings
Ingredients
  • 1½ cups pasta sauce (I use Muir Glen Tomato Basil)
  • 20-ounce package cheese ravioli (refrigerated or frozen)
  • 10 ounces frozen, chopped spinach, thawed and squeezed dry
  • 4 ounces (1 cup) shredded part-skim mozzarella
  • 2 tablespoons grated Parmesan
  • Crushed red pepper flakes, to taste (optional)
  • Cooking spray
Instructions
  1. Preheat oven to 375 degrees. Spray an 8-inch baking dish with cooking spray and set aside.
  2. Pour ½ cup pasta sauce over bottom of dish.
  3. Layer bottom of dish with half of the ravioli.
  4. Cover ravioli with ½ cup sauce and top with spinach and half of mozzarella (1/2 cup).
  5. Repeat with remaining ravioli, sauce and mozzarella. Sprinkle top with Parmesan and crushed red pepper flakes, if using.
  6. Cover dish with foil and bake for 30 minutes. Remove foil and bake until bubbling and starts to brown, about 10 minutes. Let cool for 5 minutes and then serve.

Slightly adapted from All You, March 2009

vegetarian spinach ravioli lasagna

Baked Garlic Parmesan Chicken

baked garlic parmesan chicken

Baked Garlic Parmesan Chicken puts a delicious twist on a classic favorite with some added garlic (which makes everything better!).  When I found this recipe, the title alone was so appealing, it vaulted to the top of the list and was made within a day.  I reduced the recipe to be made for two (but it can easily be multiplied for more!), added some heat with red pepper flakes and changed some of the amounts and proportions since the first time I made this, there was too much breadcrumb mixture leftover.  Served with a simple side salad or a favorite veggie, Baked Garlic Parmesan Chicken is a  healthy, quick and easy chicken dish that makes a perfect weeknight meal…or any time!

Baked Garlic Parmesan Chicken
 
Yields: 2 servings
Ingredients
  • Cooking spray
  • 1 tablespoon olive oil
  • ⅓ cup dry breadcrumbs
  • ¼ cup grated Parmesan cheese
  • 1-2 garlic cloves, minced
  • 1 teaspoon dried basil
  • Crushed red pepper, to taste
  • 2 4-5 ounce boneless, skinless chicken breasts
  • Salt and pepper, to taste
Instructions
  1. Preheat oven to 350 degrees. Line a baking sheet with foil and spray with cooking spray.
  2. In a shallow bowl, combine oil and garlic.
  3. In a separate bowl, combine bread crumbs, cheese, and basil. Add crushed red pepper to taste.
  4. Season chicken with salt and pepper to taste. Dip chicken in oil mixture and then in bread crumb mixture. Place coated chicken on prepared baking sheet. Repeat. Top with any remaining breadcrumb mixture and lightly spray tops with cooking spray.
  5. Bake for 30 minutes or until chicken in cooked thoroughly.

Adapted from All Recipes

healthy cocoa chocolate coconut date truffles balls

Healthy Chocolate Coconut Truffles

 Healthy Chocolate Coconut Truffles are an easy recipe made in minutes using only 3 ingredients with no added fat or sugar. {vegan, gluten free}

Healthy Chocolate Coconut Truffles | alidaskitchen.com
Healthy Chocolate Coconut Truffles have the delicious flavors of dark chocolate and coconut…all coming in around 60 calories and without any added sugar of fat.  They are made using only 3 main ingredients (plus an optional ingredient which helps to deepen and intensify the chocolate flavor).  Even better – they take only minutes to make.  Intrigued?  I certainly was when I first found the recipe but it took me over 9 months to make them.  I am kicking myself that it took so long…they are so amazingly good!

Healthy Chocolate Coconut Truffles | alidaskitchen.com

Thankfully, it is time again for the second installment of the Eating the Alphabet Challenge, hosted by Brenda of Meal Planning Magic.  Participating in this challenge was the extra push I needed to make these truffles.  This month we’re featuring healthy recipes using fruits, vegetables, grains or legumes that start with letters C or D.  Since Healthy Chocolate Coconut Truffles feature both coconut and dates, I’ve got both letters covered this month.

Healthy Chocolate Coconut Truffles | alidaskitchen.com

Healthy Chocolate Coconut Truffles
 
Yields: 20 truffles
Ingredients
  • 8 ounces pitted dates (approx 1½ cups)
  • 3 tablespoons unsweetened cocoa powder
  • 3 tablespoons unsweetened flaked coconut
  • 1 teaspoon espresso powder (optional)
  • ¼ cup unsweetened flaked coconut, for rolling
Instructions
  1. Put dates, cocoa, 3 tablespoons coconut and espresso powder in a food processor and puree until smooth. If mixture is too dry, add water by the teaspoonful (I needed about 3 teaspoons). If mixture becomes too wet, add more unsweetened coconut.
  2. Scoop mixture by the tablespoonful and form 1-inch balls. Roll balls in remaining coconut.
  3. Chill/store in refrigerator until ready to enjoy.

Source: Bon Appetit, June, 2012  

Pasta Pizza Pie

mushroom pasta pizza bake pie

Pasta Pizza Pie combines two Italian favorites (and two of my favorites!) into a delicious pizza-inspired baked pasta.  First, you start by baking a pasta “crust.”  Then you spread your favorite pasta sauce over the crust and top it with your favorite toppings.  I used a 12-inch saute pan in lieu of a pizza pan, and it worked great!

Pasta Pizza Pie puts a fun twist on pizza and a fun twist on pasta,…and incidentally since it’s also a “pie,” this Pasta Pizza Pie is perfect for today, March 14th (3.14)…”Pi Day!”


Pasta Pizza Pie
 
Yields: 4 servings
Ingredients
  • Cooking spray
  • 1 tablespoon canola oil
  • 1 large onion, chopped*
  • 1 cup sliced mushrooms (I used baby bellas)*
  • 2 garlic cloves, minced *
  • 1 egg, beaten
  • ¼ cup milk (I used skim)
  • 8 ounces (1/2 of a 1 pound box) rotini-shaped pasta, cooked and drained
  • 1 cup shredded part-skim mozzarella cheese (about 4 ounces)
  • 1½ cups of your favorite pasta sauce (I used Muir Glen Tomato Basil)
  • crushed red pepper flakes, to taste
  • * substitute with your favorite pizza toppings
Instructions
  1. Preheat oven to 350 degrees. Spray 12-inch saute pan or pizza pan with cooking spray and set aside.
  2. In a large skillet, heat oil over medium heat. Add onion and mushrooms and cook until tender, about 5 to 7 minutes, stirring occasionally. In the last minute, add minced garlic and stir for 1 minute. Remove from heat.
  3. In a medium bowl, stir egg, milk, pasta and ½ cup cheese. Spread pasta mixture in prepared pizza pan. Bake this pasta crust for 20 minutes.
  4. Remove pasta crust from oven and spread sauce over crust. Top with onion-mushroom mixture. Sprinkle with remaining cheese. Shake crushed red pepper flakes over cheese.
  5. Bake for 15 minutes, or until cheese is melted. Let stand 5 minutes before serving.

Source: Campbell’s Kitchen

healthy blueberry strawberry blackberry yogurt smoothie

Diet Mixed Berry Smoothie

healthy diet mixed blueberry strawberry blackberry yogurt smoothie

This Diet Mixed Berry Smoothie is quick and easy to make and perfect for breakfast on a busy morning, a post-workout recovery drink, or an afternoon pick me up.  Made with just a few healthy ingredients, it’s a vitamin-packed smoothie that can be enjoyed anywhere, anytime (and portable too for when you’re on-the-go!).


Recently, I was given the opportunity to try Ocean Spray’s Diet Juice Drinks and thought it would a tasty addition to this smoothie recipe.  At only 5 calories per serving, swapping out full-calorie juices in favor of Ocean’ Spray’s Diet Juice Drinks can help save calories (and carbs, if that’s a concern), while still tasting delicious.   For this recipe, I used Ocean Spray’s Diet Cranberry juice and it went nicely with the berries used in the rest of this smoothie.  For next time, I have my eyes on the Diet Blueberry Pomegranate!

To learn more about Ocean Spray’s Diet Juice Drinks, visit http://www.oceanspray.com/Products/Juices/Diet-Light/Diet-Cranberry-Juice-Drink.aspx.


Diet Mixed Berry Smoothie
 
Yields: 1 servings
Ingredients
  • ½ cup Diet Ocean Spray Cranberry Juice Drink, any flavor
  • ½ cup frozen mixed berries (strawberries, raspberries, blackberries and blueberries)
  • 1 ripe banana, frozen and cut into slices
  • 3 ounces fat free plain or berry-flavored Greek yogurt
  • 1 tablespoon flaxseed (optional)
Instructions
  1. Combine all ingredients in a blender (or Magic Bullet). Blend on high speed until ingredients are thoroughly combined. Pour into a chilled glass. Enjoy!
Notes
Tip: slice banana before freezing...it's much easier!

 Adapted from Ocean Spray


I have partnered with Ocean Spray through DailyBuzz to help promote their new Ocean Spray Diet product. I have been compensated for my time commitment to work with this product, however my opinions are entirely my own and I have not been paid to publish positive comments.