Categories

healthy cocoa chocolate coconut date truffles balls

Healthy Chocolate Coconut Truffles

 Healthy Chocolate Coconut Truffles are an easy recipe made in minutes using only 3 ingredients with no added fat or sugar. {vegan, gluten free}

Healthy Chocolate Coconut Truffles | alidaskitchen.com
Healthy Chocolate Coconut Truffles have the delicious flavors of dark chocolate and coconut…all coming in around 60 calories and without any added sugar of fat.  They are made using only 3 main ingredients (plus an optional ingredient which helps to deepen and intensify the chocolate flavor).  Even better – they take only minutes to make.  Intrigued?  I certainly was when I first found the recipe but it took me over 9 months to make them.  I am kicking myself that it took so long…they are so amazingly good!

Healthy Chocolate Coconut Truffles | alidaskitchen.com

Thankfully, it is time again for the second installment of the Eating the Alphabet Challenge, hosted by Brenda of Meal Planning Magic.  Participating in this challenge was the extra push I needed to make these truffles.  This month we’re featuring healthy recipes using fruits, vegetables, grains or legumes that start with letters C or D.  Since Healthy Chocolate Coconut Truffles feature both coconut and dates, I’ve got both letters covered this month.

Healthy Chocolate Coconut Truffles | alidaskitchen.com

Healthy Chocolate Coconut Truffles
 
Yields: 20 truffles
Ingredients
  • 8 ounces pitted dates (approx 1½ cups)
  • 3 tablespoons unsweetened cocoa powder
  • 3 tablespoons unsweetened flaked coconut
  • 1 teaspoon espresso powder (optional)
  • ¼ cup unsweetened flaked coconut, for rolling
Instructions
  1. Put dates, cocoa, 3 tablespoons coconut and espresso powder in a food processor and puree until smooth. If mixture is too dry, add water by the teaspoonful (I needed about 3 teaspoons). If mixture becomes too wet, add more unsweetened coconut.
  2. Scoop mixture by the tablespoonful and form 1-inch balls. Roll balls in remaining coconut.
  3. Chill/store in refrigerator until ready to enjoy.

Source: Bon Appetit, June, 2012  

Baseball Birthday Cake

how to make a baseball birthday cake

We celebrated Adam’s 3rd birthday last week!  Adam appreciates all things birthday, including parties, gifts and cake.  As my #1 cookbook reading companion, he also appreciates the importance of a good birthday cake design.

For Adam’s 2nd birthday, I assumed he wouldn’t have an opinion about his cake yet.  I worked on a plan for ball-themed cupcakes…then Adam told me he wanted a fire truck cake.  I shelved those ball cake plans and found a great design for a fire truck cake.  It was a fun challenge…I was determined to deliver a fire truck cake!

Considering how last year went, I should have known better.  Many months ago, Adam told me I could pick his cake this year.  I worked on some plans, came up with a great cake that I knew he would love.  And…you guessed it.  Within a couple days of his birthday, he told me he wanted a baseball cake.  Easy enough.  I resurrected my plans from last year to give Adam the Baseball Birthday Cake he wanted.  He was so excited about his ball cake, he started making plans for future ball cakes (i.e. Grandma wants a basketball cake, what ball do you want, mama,…).

DIY how to make a baseball birthday cake

This Baseball Birthday Cake is very easy to put together.  I made the cake the night before and then frosted and decorated it the morning of the birthday.   While the general idea is basic, I am sharing this simply because everybody knows a baseball fan, and who doesn’t love a fun cake!  This Baseball Birthday Cake is sure to put a huge grin on anybody’s face.

DIY how to make a baseball birthday cake

Baseball Birthday Cake
 
Directions for decorating a 9-inch round baseball birthday cake
Ingredients
  • 1 round cake, frosted with white frosting
  • red licorice vines
  • sweetened coconut (optional, for grass)
  • green food coloring (optional, for grass)
Instructions
  1. Put cake on serving plate or cake board.
  2. Cut licorice into ½" inch pieces (approximately 72-80 pieces, depending on size of and spacing on the cake).
  3. Take 2 licorice pieces to create a wide v-shape, like the lacing on a baseball, and place on top of the frosted cake. Repeat with remaining pieces until desired "lacing" is achieved.
  4. To make grass, put coconut in a ziploc bag. Put a couple drops of green food coloring in bag with coconut and seal bag. Then shake and squeeze/massage together until coconut has turned green. Sprinkle along outside of cake, as desired.
Notes
I found cutting the licorice vines the night before decorating made them less sticky on the hands when placing them on the cake. Also, if you aren't able to find licorice vines, you can easily use red frosting for the laces.


Healthy Banana Cookies - vegan, no added sugar and nut free | alidaskitchen.com

Healthy Banana Cookies

Healthy Banana Cookies - vegan, no added sugar and nut free | alidaskitchen.com
 Healthy Banana Cookies are a chewy, fruit-filled cookie made using some of my favorite foods – oats, dates and bananas.  They are made from simple, wholesome ingredients, have no butter and added sugar, thus making them a healthier choice.  I love the simplicity of these cookies and have to admit these cookies made a delightful breakfast!  These Healthy Banana Cookies also happen to be dairy free and can be gluten free.
Healthy Banana Cookies from Alida's Kitchen

I have had this at the top of my ‘to make’ pile for months just waiting for some super ripe bananas.   While we always have plenty of super ripe bananas in the house, they’re typically reserved for Pumpkin Banana Muffins or Pumpkin Banana Pancakes (or Strawberry Banana Pancakes once strawberry season hits).  Fortunately, I was a muffin and pancake making machine in advance of our new baby’s arrival, stocking the freezer full of Adam’s favorite banana goodies.  With a stocked freezer and 3 very ripe bananas, it was finally my opportunity to try these Healthy Banana Cookies!

Healthy Banana Cookies | alidaskitchen.com
Healthy Banana Cookies
 
Yields: approx. 24 cookies
Ingredients
  • 3 very ripe bananas
  • 2 cups rolled oats (old-fashioned or quick cooking work fine)
  • 1 cup (8 ounces) pitted dates, chopped
  • ⅓ cup canola oil
  • 1 teaspoon vanilla extract
  • 1 teaspoon cinnamon
Instructions
  1. Preheat oven to 350 degrees. Line cookie sheets with parchment paper and set aside.
  2. In a large bowl, mash bananas. Add oats, dates, oil, vanilla and cinnamon, and mix well. Let sit for 15 minutes.
  3. Drop dough by rounded teaspoonful onto prepared cookie sheets. [Note: the cookies don't spread so you may want to shape them a bit]
  4. Bake cookies for 20 minutes, or until they are golden brown. Let cool on cookie sheet for 5 minutes and then move to a wire rack to cool completely.
Notes
These are best enjoyed the day after baking.
healthy banana cookies vegan dates oats

Coincidentally, this is also the first month of the Eating the Alphabet Healthy Recipe Challenge for 2013, hosted by Brenda of Meal Planning Magic.  Each month, several bloggers will focus on healthy recipes featuring fruits, vegetables grains or legumes, from a couple different letters (this month it is A or B).  I thought Healthy Banana Cookies would be the perfect healthy recipe to start off this fun series.

easy make ahead chocolate pudding cakes

Warm Chocolate Pudding Cakes


While Valentine’s Day isn’t a huge deal at our house, it does give me a reason to bake up something extra special…usually involving chocolate.  Warm Chocolate Pudding Cakes are definitely something special.  They are a simple yet decadent dessert that is pure comfort food.  They are also surprisingly quick and easy to make and can even be made a day in advance (great for entertaining!).  The recipe can easily be halved to serve only two, OR make the full recipe and enjoy one set of cakes one day and enjoy them again the next day.   Warm Chocolate Pudding Cakes are delicious as-is, or topped with your favorite ice cream.  I had vanilla bean on hand, which was classic and tasty, but I am drooling over the idea of a salted caramel ice cream topping these cakes.

Since I made the full recipe for the two of us, we got to enjoy Warm Chocolate Pudding Cakes two nights in a row.  I’m pretty sure Valentine’s Day is going to become one of our favorite holidays now, if it means special desserts like this! 

Warm Chocolate Pudding Cakes
 
Yields: 4 servings
Ingredients
  • 4 ounces semi-sweet or bittersweet chocolate, chopped
  • 4 tablespoons (1/2 stick) butter
  • 4 tablespoons granulated sugar, divided
  • 2 eggs, whites and yolks separated
  • 1 teaspoon vanilla extract
  • pinch of salt
  • Cooking spray
Instructions
  1. Preheat oven to 375 degrees (if not making ahead). Spray four 6 to 8 ounce ramekins with cooking spray, place on a baking sheet and set aside.
  2. In a double boiler (or a mixing bowl placed over simmering water), melt chocolate and butter, stirring occasionally. Once melted, remove from heat and mix in 2 tablespoons sugar and then egg yolks and vanilla, stirring until until combined. Set aside.
  3. In a medium bowl, beat egg whites and salt until soft peaks form. Add 2 tablespoon sugar and beat until stiff and glossy.
  4. Fold ⅓ egg white mixture into chocolate mixture, gently stirring to combine. Add the rest of the egg whites, gently folding until combined. Divide evenly among prepared ramekins. (If making ahead, stop here. Cover cakes with plastic wrap and refrigerate until ready to bake).
  5. Bake for 15 to 20 minutes, or until the cakes puff up and the tops begin to crack. Be careful not to over bake. A toothpick inserted in the center should come out gooey. Serve warm or at room temperature, topped with ice cream, if desired.


Source:  Everyday Food, December 2006

Lemon Buttermilk Cake

easy lemon buttermilk breakfast pound cake


We had a special surprise arrive last Friday ~ our baby decided to arrive a little early!  Naturally, when there is a birthday, there must be a birthday cake.  This Lemon Buttermilk Cake is quick and easy enough for a sleepy mama to whip together in minutes.  It’s not only simple to make, but the lemon cake is perfectly lemon-y, refreshing and delicious.  To dress it up, I added a simple lemon buttermilk glaze to drizzle over the loaf, with some extra to drizzle on the slices.  This cake is so good as-is, but the glaze adds a little something that makes it feel extra special.  Adam could not get enough of the baby’s birthday cake, and I discovered that despite not being a frosting person, he loves glaze.  Who can blame him!

Now to the baby details!  We had a baby girl named Greta Rose.  She is an easy baby so far and super sweet.  Seems fitting I guess, because the same could be said about Lemon Buttermilk Cake! 🙂

easy lemon buttermilk breakfast pound cake with lemon glaze


Lemon Buttermilk Cake
 
Yields: 8 to 10 servings
Ingredients
  • 2 cups all-purpose flour
  • 2 teaspoons baking powder
  • ½ teaspoon salt
  • 1½ cups granulated sugar
  • ½ cup canola oil
  • ¾ cup buttermilk, well-shaken
  • 2 eggs
  • 1 tablespoon lemon zest (finely grated, approx 2 lemons)
  • ¼ cup lemon juice (approx 1½ lemons)
  • 1 teaspoon vanilla extract
  • Cooking spray
  • GLAZE:
  • 1 cup powdered sugar
  • 1½ tablespoons fresh lemon juice
  • 1 to 2 tablespoon(s) buttermilk, well-shaken
Instructions
  1. Preheat oven to 350 degrees. Spray 8"x4" loaf pan with baking spray and set aside.
  2. In a large bowl, whisk together flour, baking powder and salt.
  3. In a medium bowl, add the sugar, oil, buttermilk, eggs, zest, juice and vanilla and whisk to combine.
  4. Add buttermilk mixture to flour mixture and whisk to combine. Pour into prepared loaf pan.
  5. Bake for 65 to 75 minutes, or until a toothpick inserted into the center comes out clean. Let cool in pan for 15 minutes and then transfer to a wire rack to cool completely.
  6. To prepare glaze, in a small bowl, whisk the powdered sugar, lemon juice and buttermilk until well-blended. Drizzle over cooled cake, as desired.

Sources: Real Simple for the cake, Cooking Light for the glaze

12 Weeks of Christmas Treats ~ Round Up

12 Weeks of Christmas Treats from Alida's Kitchen
 Each week for the past 11 weeks, I have joined a group of bloggers in sharing a variety of holiday treats as part of the 12 Weeks of Christmas Treats (I missed week #1).  I can’t believe we started all the way back in September, and here we are less than a week away from Christmas!  In the event you still have some holiday treats to make (or if you’re like me and stockpiling recipes for next year!), below is a round up of the treats I shared.  Just click on the recipe name after the Week # and you’ll be directed to the corresponding post.

I have also selected an “Alida’s Pick” from each week, featuring a link to a recipe by another blogger.  There are so many delicious recipes that were shared over the past weeks, it was hard to choose.

I want to thank Brenda from Meal Planning Magic for hosting the blog event 12 Weeks of Christmas Treats, as well as all the other fellow bloggers for participating.  My list of recipes to make has increased exponentially as a result!

Week #2: Grandma’s Lemon Bars

Alida’s pick from Week #2:  Pumpkin Coffee Cake by Baker Street

Week #3: Pumpkin White Chocolate Chip Cookies

Alida’s pick from Week #3: Peppermint Marshmallows by The Redhead Baker

Week #4: Easy Chocolate Sandwich Cookies

Alida’s pick from Week #4: Snickersnaps by Cooking to Perfection

Week #5: Mounds Brownies

Alida’s pick from Week #5:  Peppermint Patties by Delicious Melicious

Week #6: Pumpkin Bundt Cake

Alida’s pick from Week #6:  White Hot Fudge Sauce by Baked Bree

Week #7: Sunny Blossoms

Alida’s pick from Week #7:  Candy Cane S’mores by Roxana’s Home Baking

Week #8: Pumpkin Cheesecake Bars

Alida’s pick from Week #8:  Pretzel S’mores by Books ‘n Cooks

Week #9:  Pumpkin Surprise Cupcakes

Alida’s pick from Week #9:  Peppermint Blondies by Kitchen Meets Girl

Week #10:  Grandma’s Caramel Bars

Alida’s pick from Week #10:  Mini Pumpkin Cheesecakes by Karen’s Kitchen Stories

Week #11:  Peppermint Twist Kiss Cookies

Alida’s pick from Week #11:  Soft Sugar Cookies from Midwestern Girl

 Week #12:  Chewy Ginger Cookies 

Alida’s pick from Week #12:  Peppermint Cake Roll by Baking and Boys

cream cheese cookies with lemon glaze

Cream Cheese Meltaways

cream cheese meltaways with lemon glaze

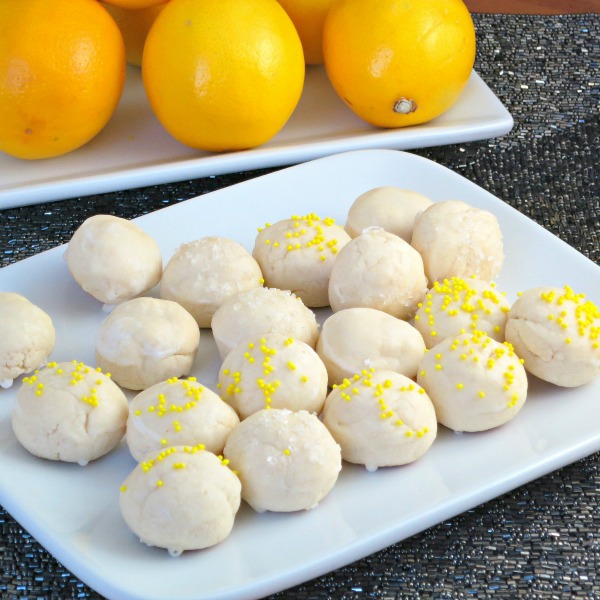
Cream Cheese Meltaways with Lemon Glaze are little bite-sized cookies that are a light and delicious addition to any holiday cookie platter.  These cookies were a new addition this year, and they were an instant favorite!  The lemon glaze gives just a hint of lemony sweetness to the cream cheesy butter cookies.  The recipe for glaze makes plenty.  You could probably get by with using half the glaze recipe, or better yet – double the cookie recipe…these will go fast!

Cream Cheese Meltaways
 
Yields: 36 cookies
Ingredients
  • 1¼ cups all-purpose flour
  • ½ cup cornstarch
  • ⅛ teaspoon salt
  • 1 cup powdered sugar
  • ½ cup butter, softened (I used light butter)
  • 2 ounces block-style Neufachtel cream cheese (1/3 less fat/light)
  • 1 teaspoon vanilla
  • Glaze:
  • 1¾ cups powdered sugar
  • ¼ cup fresh lemon juice
  • assorted sprinkles, for decorating (optional)
Instructions
  1. Preheat oven to 375 degrees. Line cookie sheets with parchment paper and set aside.
  2. In a medium bowl, whisk flour, cornstarch and salt until combined.
  3. In a large bowl, add powdered sugar, butter, cream cheese and vanilla and beat at medium speed until light and fluffy.
  4. Add flour mixture to butter mixture, stirring until combined. (Note: dough will be dry and crumbly).
  5. Shape dough into 1-inch balls (be careful not to overwork dough) and place on prepared cookie sheets.
  6. Bake for 8 to 10 minutes, or until bottoms of cookies are lightly browned. Cool 5 minutes of pan and then move to wire rack to cool completely.
  7. GLAZE: In a medium bowl, whisk powdered sugar and lemon juice until smooth. Dip the tops of cooled cookies into glaze and place on wire rack. Decorate with sprinkles, as desired. Let cookies stand until glaze is set.

Source:  Cooking Light

cream cheese meltaways from Alida's Kitchen

Chewy Ginger Cookies

Chewy Ginger Cookies

Chewy Ginger Cookies

This is my favorite recipe for Chewy Ginger Cookies. They are soft, chewy, with warm flavors of ginger and molasses, plus they take 10 minutes to prepare!

When it comes to holiday baking, I enjoy trying new recipes, but I also like to have some go-to recipes.   Standby recipes that are guaranteed to be crowd pleasers and are easy to make.  For years, I have been trying to find that special recipe for a ginger cookies.  These Chewy Ginger Cookies are the top contender for becoming that special recipe.  They are super soft and chewy with the warm flavors of ginger and molasses in each bite.   The dough takes less than 10 minutes to make, which is always a bonus!

This marks the final week of the 12 Weeks of Christmas Treats hosted by Meal Planning Mom.  Be sure to check out the thumbnails at the bottom of this post for more delicious holiday treats!

Chewy Ginger Cookies
 
Yields: 30 cookies
Ingredients
  • ½ cup butter, softened
  • ½ cup granulated sugar
  • 2 cups all-purpose flour
  • ½ teaspoon baking soda
  • ½ teaspoon ground ginger
  • ¼ teaspoon cinnamon
  • ¼ teaspoon salt
  • ½ cup molasses
  • ¼ cup water
  • Additional sugar, for rolling
Instructions
  1. In a medium bowl, whisk together flour, baking soda, ginger, cinnamon and salt.
  2. Mix molasses and water in a liquid measuring cup, and stir until combined (Note: you may need to stir again before adding to butter mixture).
  3. In a large bowl, cream butter and sugar until combined. Beating on low, alternately add flour mixture and molasses mixture to the butter mixture, until fully combined. Refrigerate for at least 2 hours to overnight.
  4. Preheat oven to 350 degrees. Line cookie sheets with parchment paper and set aside.
  5. Roll a rounded tablespoonful of dough into a ball and then roll the ball in granulated sugar. Place on prepared baking sheet. Bake for 12 to 14 minutes or until edges are set (be careful not to overbake). Remove to wire rack to cool completely.

Slightly adapted from Taste of Home: Best Loved Cookies and Bars


We are to Week #12 of the 12 Weeks of Christmas Treats hosted by Meal Planning Magic. Be sure to check out all the other bloggers who are participating this week in the 12 Weeks of Christmas Treats blog hop.


Peppermint Twist Kiss Cookies

 Peppermint Twist Kiss Cookies are a fun variation of the ever-popular “blossom” cookies with a candy kiss in the middle. These light-tasting peppermint cookies have a red and white swirl that are cute and festive for the holidays or any time! 
Peppermint Twist Kiss Cookies | alidaskitchen.com
Peppermint Twist Kiss Cookies are tasty, fun and festive…perfect for this time of year!  The red and white cookie is a light-tasting peppermint butter cookie, and then topped with a chocolate kiss.

Grandma’s Caramel Bars

 My grandma was always impressive in the kitchen, especially with her holiday treats.  This recipe she created for Caramel Bars is no exception!  Most caramel bars I’ve had have been underwhelming and have had a relatively stiff caramel layer in the center.  So is not the case with these Caramel Bars.  The caramel layer is gooey, melty and wonderful.   The oat crust and crumbly topping are simple and delicious, and the chocolate chips add some chocolate and texture.  Her recipe also includes 1 cup walnuts, which I do not use.  No holiday treat platter is complete without caramel bars!

Speaking of holiday treats, we are in Week 10 of the 12 Weeks of Christmas Treats!  This recipe makes a generous amount, so is definitely a good treat to have on hand for your holiday celebrations.

Grandma’s Caramel Bars
 
Yields: 3 to 4 dozen bars, depending on size
Ingredients
  • 1½ cups all-purpose flour
  • 1½ cups rolled oats (old-fashioned or quick oats work fine)
  • 1 cup butter, softened (I use light butter)
  • ½ cup packed brown sugar
  • ½ cup granulated sugar
  • ¾ teaspoon baking soda
  • ½ teaspoon salt
  • 1 14-ounce package caramels
  • ⅓ cup evaporated skim milk
  • 1 cup chocolate chips
  • 1 cup walnuts (optional)
  • Cooking spray
Instructions
  1. Preheat oven to 350 degrees. Spray a 13x9 inch baking pan with cooking spray and set aside.
  2. In a large bowl, put the flour, oats, butter, brown sugar, baking soda and salt. Using an electric mixer on low (I use a hand mixer), slowly beat in the butter until combined, moist, and pea-sized crumbs form. Press ½ of mixture into prepared baking dish and bake for 12 minutes.
  3. Meanwhile, slowly melt caramels and evaporated milk over a double boiler (or a heatproof bowl set over a saucepan of simmering water), stirring frequently.
  4. Once crust is done, pour caramel mixture over crust. Sprinkle chocolate chips (and walnuts, if using) over caramel. Crumble remaining oat mixture over caramel and chocolate chips. Bake for 12 minutes and move to a wire rack to cool completely.

We are already to week #10 of the 12 Weeks of Christmas Treats hosted by Meal Planning Magic.  Be sure to check out all the other bloggers who are participating this week in the 12 Weeks of Christmas Treats blog hop. And if you’re a blogger and want to join in on the fun, check out this post for the form to fill out to start baking along with us.